Sunday, May 29, 2011

Seitan Empanadas, Sauteed Kale, Pan Fried Yucca, Simple Salad

Today was my day for Spring Cleaning!  Time to go throughout the house and organize and clean everything, getting rid of things we haven't been using and use up the things that are getting a bit old.  I went through both the refrigerator and freezer.  The fridge was fine - just a little unorganized and messy, but nothing in particular that had  been in there for a while.  The freezer was an entirely different story.  I feel like I use it a lot when I have great intentions of saving something to use it later, but then it gets pushed to the back and forgotten about.  So, I went through it and discovered several things:
1.  I still have tons of homemade freezer jam - at least 5 pint containers (yikes, what am I going to do with all of those!?)
2.  I still have two small bags of homemade Monster cookies my Mum made for the Hubby and I the last time I visited her (which was definitely last year some time!).  Mum made them using white sugar, which the Hubby and I never eat, so we found them way too sweet (sorry Mum!) and couldn't eat them, but didn't want to throw them away because of all the love and effort she put into them.  But, after finding them a year later, I thought it was time to let them go.
3.  There was a bag of ground almonds I had left over from a Friday Night Dinner at the Natural Gourmet Institute a long time ago that I didn't want to get rid of, and after using it on everything I could possibly think of, I tasted it and it was quite freezer burned!  Sad!
4.  Lastly!  There was a package of Goya Discos para Empanadas (Goya pastry circles, specifically used for Empanadas and other appetizers) that was hanging out in there for about three months.  That could be used up though, so I took it out of the freezer, let it thaw on the counter until completely thawed, and made the filling for empanadas, using up come ground seitan I had left over from when I made tacos.  These took a while to make, but were so worth it, and now that I know how easy those discos are to work with, I'll definitely buy them again, but this time, use them much sooner!

Seitan Empanadas:


Seitan Empanadas, Garlic Sauteed Kale, Pan-Fried
Yuccs, Salad with Carrots, Scallions & Croutons

 Yields 10 Empanads, plus 1 cup additional filling

2 tablespoons olive oil
1 cup small diced onion
3 scallions, thinly sliced
1/2 orange bell pepper, small diced, about 1/2 cup
1/2 green bell pepper, small diced, about 1/2 cup
1 small jalapeno, minced, about 2 tablespoons
4 cloves garlic, minced
2 cups small diced seitan
4 tablespoons chopped pimento stuffed olives (about 12-14 olives)
1/4 teaspoon onion powder
1/4 teaspoon garlic powder
1/4 teaspoon chili powder
1/4 teaspoon black pepper
1/2 teaspoon boullion powder
1/2 teaspoon smoked paprika
3-4 tablespoons vegetarian oyster mushroom sauce
1 tablespoon vegan parm

10 pre-made empanada shells
1/2 " no-taste oil, such as canola or vegetable

1.  Place a large wok over medium-high heat and add the oil. Allow the oil to become hot and add the onions, scallion, green and orange bell peppers, jalapeno and garlic cloves.  Saute for several minutes until softened.  Add the seitan and cook for several additional minutes.
2.  To the veggie-seitan mixture, add the olives and all the spices, stirring to coat.  Add the oyster mushroom sauce and the vegan parm and stir well to coat.  Continue cooking the mixture the flavors have melded and some of the liquid has cooked off.
3.  Turn the heat on under the pot with the oil to medium high.  Allow it to become hot. 
4.  In the meantime, place one of the pre-made empanada shells on your cutting board. Lightly roll them out with a rolling pin, just to enlarge them slightly.  Place a couple tablespoons of the filling in the center and bring the top portion of the dough to the bottom, pressing the edges together until the empanada is securely sealed.  Repeat with remaining filling and shells. 
5.  Once the oil is hot, carefully place 2 empanadas at a time into the oil, cooking for about 30-60 seconds per side.  All you want is for the outside to become nice and golden.  If the outside is browning too quickly, turn down the heat. 
6.  Remove the empanadas from the oil with either a slotted spoon or a pair of tongs and place on a paper towel lined plate to absorb the oil and serve.  You don't need a dipping sauce because the center is so flavorful.

Enjoy!

-K

Friday, May 27, 2011

Homemade Mayo

I love mayo.  I really do.  But I have tended not to use it too much because it is pretty expensive.  Not sure about you guys, but Veganaise is by far the best brand out there and tastes exactly like how I remember "real" mayonnaise to taste.  Nice and fatty, salty and creamy.  So, after browsing random recipes online one day, I happened to come across a recipe for homemade vegan mayo.  I have made vegan mayo several times in the past, so it's not like I don't know what I'm getting into.  I think it's the laziness factor of making mayo, because it always seems to take so much time and make such a mess. 

I created a recipe for it when I was the Head Chef at Organic Heights in Park Slope, Brooklyn (they're closed now).  It used blanched firm tofu, mustard, olive oil and other seasonings and it was really tasty, but I can't make it at home because I don't have a vita mix to make it all beautiful and creamy.  If I use my regular blender, it doesn't blend properly and I don't have a plunger to help it along like the vita mix, and if I use my food processor, it doesn't get it creamy enough.  I have also made the kind of mayo where you drizzle oil into the blender with other ingredients, a drop at a time.  That sucks because it literally takes like half an hour to drizzle in the oil - I do not have patience for that!  So, I came across this recipe, was quite suspicious, but tried it and was surprised and thrilled when it worked out.  I changed a couple things about it, which you will see in my recipe below, but I definitely licked it and will be making it again.   Once I knew that it worked, I mixed some with a little chipotle pepper powder and used it to spread on sandwich bread.  A nice spicy, creamy kick.  Try it!

Homemade Vegan Mayo:


Creamy, Salty, Tasty Mayo!


Yields: 3 1/2 cups (you can halve the recipe, but it keeps for quite a while)

2 1/4 cups canola oil or other no-taste oil
1 cup unsweetened soymilk
1 1/2 teaspoons sea salt
1/2 teaspoon Dijon mustard
2 1/2 teaspoons apple cider vinegar


1.  Combine the oil, soymilk, sea salt and mustard in a blender and blend together.  It will become extremely thick very quickly.  Don't worry, this is supposed to happen. 
2.  Turn off the blender and drizzle in the vinegar.  Blend it again and it will become insanely thick - just like mayo.  It will be so thick that the blender will need a little help getting it all together.  Stop the blender, scrape down the sides, making sure all the vinegar gets combined and blend again until completely thick and totally combined.
3.  That's it!  You can use it right away, but I like to chill it for a couple hours before using.  Who likes warm mayo?  *Shudders*  Also, the flavors are definitely much better after a couple hours.  But do try a touch of it as soon as you make it.  You will be quite pleasantly surprised about how truly mayo-like it is!

Enjoy!

-K

Wednesday, May 25, 2011

Gluten Free Wednesday: "Chicken" Sandwich on Homemade Focaccia

Happy Gluten Free Wednesday!

There is this amazing little place on 23rd Street between 5th and 6th Avenues right by the F/M train at 23rd Street Subway Station, called Terri.  Strange name I will definitely admit, and it really doesn't conjure up any images of what the place could be, but it is great, believe me.  It is a quick little convenience/sandwich/salad shop that is entirely vegan and very gluten free friendly.  And they make good sandwiches.  Seriously.  I have had several of them, but really try not to, especially lately, because they can be pretty expensive - $8 just for the sandwich, no salad or drink.  If you want either of those, it will run upwards of $16.  Anyway, they make this sandwich called Chicken Bacon Ranch on Focaccia.  The first time I had it, I fell in love.  Seriously.  But as I said, it can get a little expensive, so I wanted to mimic it.  Then I had a great idea to adapt it and make it gluten free so L could have it.  Unfortunately, due to time constraints, I could not follow through and make it a true "Chicken Bacon Ranch", so it because just a "Chicken" Sandwich, but it was still damn damn damn good.  Next time though, I will definitely fry up some tempeh bacon, melt some Daiya, and add Ranch Dressing.  And I will also toast the focaccia.  Once I started eating the sandwich, I realized something was different about it, but couldn't figure it out.  By the time I had almost finished it, I realized that I forgot to toast/grill the sandwich!  Oh well, just an excuse to make this again!  Just be aware that the focaccia is seriously only good for one day - after one day, even unrefrigerated, the dough becomes really tough and dry.  So grab a couple of your friends and be sure to eat it all in one day!


Chicken Sandwich on Homemade Focaccia:


Yields 6 Sandwiches

Sandwich Components:

Homemade Vegan Mayo or Veganaise
1 tomato, sliced
1/2 red onion, sliced into strips
Lettuce Leaves
6 GF Pepper Steak Patties, lightly fried

Focaccia:
1 cup sorghum flour
1 cup potato starch
1/2 cup millet flour
2 teaspoons xanthan gum
2 teaspoons sea salt
1 teaspoon onion powder
1/2 teaspoon garlic powder
2 teaspoons dried basil
1 teaspoon dried oregano
1/2 teaspoon minced fresh rosemary
pinch black pepper

1 1/3 cup warm water
1 tablespoon yeast
pinch raw sugar

1/4 cup extra virgin olive oil, plus additional for drizzling over top
2 tablespoons flax eggs
1 tablespoon agave
1/2 teaspoon apple cider vinegar

1.  Preheat oven to 350 degrees.
2.  In the bowl of a stand mixer, add the yeast, warm water and pinch of raw sugar.  Stir together and allow to sit for 5-10 minutes, or until nicely bubbly. 
3.  To the bowl of the mixer, add the olive oil, flax eggs, agave and cider vinegar.  Stir together until all the wet ingredients are well combined. 
4. In a medium mixing bowl, combine all of the dry ingredients and whisk together until completely combined.  Carefully pour the dry ingredients into the mixed wet ingredients in the bowl.  Using the paddle attachment, mix ingredients together until a thick batter forms.  Keep in mind that gluten free doughs do not look or act at all like wheat doughs, so do not be alarmed when you see that it looks like a thick pancake batter. 
5.  Generously oil a 9" or 10" square baking pan.  8" is too small and will make extremely thick focaccia, not suitable for sandwiches.  Place all of the dough into the pan and smooth out with a rubber spatula.  Drizzle with olive oil and sprinkle with sea salt and chopped fresh rosemary. Place in a warm place and allow to sit there for 30 minutes, or until is has risen to about double the size.
6. Drizzle with a small amount more of the olive oil and bake for 20 minutes or until the edges are golden and the top is firm. 
7.  Allow the dough to cool for several minutes before removing from the pan.  The dough has to be almost completely cooled before slicing. 
8.  Get all the rest of the components of the sandwich ready. 
9. Assemble as follows:


The Dough in the Pan, Drizzled with Oil, Sprinkled with
Sea Salt & Rosemary


The Dough After Having Risen for 45 Minutes.


The Focaccia, After Baking for 20 Minutes.


After Focaccia Cools, Cut into Sandwich-Sized Squares


Cut Each Piece in Half to Make 2 Slices


Slather Both of the Slices with Vegan Mayo.


Add the Fried Pepper Steak Patty.


Top with Delicious Ripe Tomatoe Slices


Top with Red Onion Slices (As Much or Little as You Like!)


The Sandwich all Put Together (I added lettuce)


Enjoy!

-K

Sunday, May 22, 2011

Pasta with Sausage & Peppers

I made this dish to help use up the sausages I made from Vegan Brunch.  You wouldn't think four sausages are a lot, but it turns out they are.  The sausages are so jumbo, that it's probably really like 8 sausages.  They were super tasty and I will make them again, but most likely in a half batch.  I was really creative with this batch, making brunch, two different pastas, topping a pizza with them, chopping them and adding them to burritos - the list goes on and on.  At some point I would like to try the other sausage options in the book.

I am actually sort of trying to make my way through the entire cookbook, making everything, or most everything (there are a couple dishes in there I am pretty sure I would not like).  There are actually a few cookbooks I am slowly making my way through.  I have a bunch of them, they have been sitting there for a couple years while I've been in the city, just collecting dust, so I might as well do something with them right?  After all, why did I buy them in the first place?  That's what the Hubby has been saying lately anyway, and I agree.  It also forces me to be more creative, because I definitely feel that I have been in a rut lately, cooking wise.  I feel like I am making the same thing over and over again and even though it is tasty, it's kind of boring.  I am especially doing this with kale.  I absolutely love kale, but I always find myself either braising or sauteing it.  I have baked it several times, but the end result is the same.  Any new ideas on how to cook kale? 

I am pretty excited though, because I have been asking my Mum for the longest time to send me the rest of my cookbooks - I know there are probably at least 50 more, most of them being vegetarian and several being vegan.  Some are even raw, though I am not super interested in that anymore.  Who has the time?  Can't wait for the books!  I'll let you know when they're here, and see if there is anything interesting that I rediscover!  It has been over 4 years, after all!

Pasta with Sausage & Peppers:


So Simple and Tasty!

Serves 4

8 oz. spaghetti, broken in half while uncooked

Sausage & Peppers:
4 tablespoons Earth Balance
1 1/2 tablespoons olive oil
1 small orange pepper, julienned, about 1/2 cup
1 small yellow pepper, julienned, about 1/2 cup
1 small green pepper, julienned, about 1/2 cup
15-20 green beans, tough ends removed
4 cloves garlic, minced
1 vegan sausage, preferably homemade, lightly fried
5 artichoke hearts, quartered
1/4 teaspoon black pepper
1/2 teaspoon sea salt
Vegan Parm, to serve

1.  Begin by cooking the pasta.  Bring a large pot of salted, oiled water to a boil.  Once boiling, drop in the pasta, stirring immediately so it does not clump.  Cook just until al dente, then drain and keep hot.
2.  Place a wok over medium-high heat on the stove and add the earth balance and olive oil.  Allow the earth balance to melt.  Once it is nice and bubbly, add the orange, yellow and green peppers, as well as the green beans.  Saute, stirring periodically until beans are tender-crisp. 
3.  Add the minced garlic and cook for about 2 minutes, or until fragrant.  Add the remaining ingredients: the sausage, sliced on the diagonal, artichokes, sea salt and black pepper.  Stir everything together and season to taste. 
4. To serve, place a portion of the cooked pasta on your plate, top with a heaping serving of the sausage/peppers mixture.  Sprinkle with vegan parm if desired.

-Enjoy!

-K

Friday, May 20, 2011

BLT Wrap

When I made that homemade tempeh bacon earlier in the week, I had no idea it would make so much or that it would take me so long to eat it. When it's just a regular package of tempeh, it can get eaten up pretty quickly in my household.  Once it becomes bacon though, it seems a little inappropriate to eat so much of it.  It's nicely salty, smoky and a touch sweet and I am sure it would go so well with so many things: twice baked potatoes, stuffed mushrooms, sauteed with some collards, etc., etc., etc. 

After having eaten BLT's for breakfast for literally three days in a row, I didn't really want to eat tempeh bacon anymore, but every time I opened my fridge, there it was staring a me.  As soon as I cooked it though, I couldn't get enough of it, and I find that the 3 grain tempeh has such an awesome texture, much preferred over the regular tempeh.  I again just used what I had on hand and decided to make a BLT wrap and it was amazing.  Of course I overstuffed the wraps with tomatoes and lettuce and ended up with a little bit of a saucy lap, but it was so worth it!  Whoever came up with this combination was seriously a genius! 

BLT Wrap:

Serves 2


There is Nothing Better Than a BLT!
Except a Wrap, b/c Now I Can Take it With Me!


2 whole wheat or multigrain wraps
4 green or red lettuce leaves
4 whole pieces Tempeh Bacon, cut in half to create 8-1/2 pieces
2 tablespoons veganaise
1 small tomato, thinly sliced
2 slices red onion, separated into rings
Sea salt, black pepper and cayenne pepper to taste

1.  Heat the tortilla on the stove (or if you have a micro, you can heat it there for a few seconds) just until it's pliable.
2.  Spread the veganaise evenly over the surface.  Place the lettuce leaves in the center.  Add the tomato and sprinkle with sea salt, black pepper and cayenne pepper to taste.  Place the cooked tempeh bacon over the lettuce and place the onion over top.  Roll the wrap: Fold the bottom towards the center, followed by the two sides, carefully rolling the bottom towards the top while continuing to fold in the sides until you reach the back.  Tuck the other end underneath.
3.  Slice the wrap in half on the diagonal and serve with a salad or some baked tortilla chips.  Yum!

Enjoy!

-K

Wednesday, May 18, 2011

Gluten Free Wednesday: Broccoli Vegetable Quiche with a Potato Crust

Happy Gluten Free Wednesday!

(This is the post I attempted to submit this past Wednesday, but here it is now!)
I'm not really sure how this meal started.  All I know is that half way through preparing it, I wanted to throw my hands in the air and/or pull my hair out.  I had initially started off by making a gluten free pastry crust, out of a new gf cookbook I recently received as a gift from a friend.  Everything in the book was so beautiful and I had such high expectations.  The book was not even vegetarian, let along vegan, but that is pretty normal for gf cookbooks.  So, in the crust I substituted Earth Balance for the butter and used non-hydrogenated vegetable shortening as called for in the recipe.  I also refrigerated it for half an hour as indicated in the recipe.  I followed it exactly, minus substituting the Earth Balance for the butter, but that is a direct substitution.  I did a test run - I baked a small tart shell of the pastry crust and was so excited - it looked beautiful and buttery and delicious.  When it came out, I could barely wait for it to cool.  When I tasted it ... I almost gagged and spit it immediately into the garbage.  It was all butter!  And not in a good way at all!  It completley fell apart when I picked it up (yes, of course I used xanthan gum!), and as soon as it touched your tongue, it disintigrated into a thousand disgusting, gritty pieces. 

Damn!  I had already made the filling ingredients though, so I had to do something!  Then I recalled seeing a blog where a woman used thinly sliced potatoes as the crust.  It could work, I thought.  So, I tried it, and realized something right away, when I tried par-baking it.  #1: You need to spray a little bit of oil on the potaotes when they go in the oven, or they shrivel and turn greyish-black.  and #2: You really have to overlap the potatoes, because they will shrink and leave giant gaps where the filling can spill out.  This ended up being really tasty - everyone had seconds!  But, I' not sure I will make it again - at least not the potaotes as crust part.  Phew!

Broccoli Vegetable Quiche with a Potato Crust:


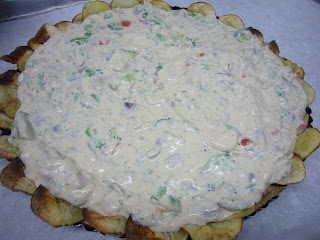
Potato Crust, Vegetable Filled Quiche
 Serves 10-12

Crust:
6 medium potatoes, scrubbed but not peeled, sliced thinly on a mandoline
sprinkled with black pepepr before baking, drizzled with oil.  when finishes baking, sprinkle with salt.

Filling:
2 pkg. silken tofu
2 tablespoons extra virgin olive oil
1 medium red bell pepper, small diced, about 1 cup
1 jalapeno, minced, about 2 tablespoons
2 heads broccoli (save stems for another use), chopped
10-15 crimini mushrooms, sliced
1 1/2 tablespoons chopped garlic, about 6 cloves
1 large red onion, small diced, about 1 1/2 cups
2 teaspoons sea salt
1 teaspoon onion powder
1 teaspoon garlic powder
1 teaspoon dried basil
1/2 teaspoon black pepper
1/2 teaspoon red pepper flakes
1 Rapunzel vegetable boullion cube, broken apart with fingers
1/4 cup cashew butter
1/4 cup unsweetened soymik
4 tablespoons arrowroot powder
3 tablespoons mirin
1/4 teaspoon chipotle pepper powder

1.  Make the crust first.  Line the bottom of a 12" quiche pan with aluminum foil.  Generously oil the bottom and sides of the pan.  Layer the sliced potaotes all along the bottom and sides of the pan - and I mean layer them!  See below.

Layer, Layer Layer those Potatoes!
2.  Sprinkle the potaotes with black pepper and drizzle with olive oil.  Place in the oven and bake for about 8-10 minutes.  Remove from the oven and immediately sprinkle with sea salt.  If you sprinkle with the salt before baking, it will make the potatoes release too much water, and they will become tough. 
3.  Prepare the filling:  in a large wok over medium-high heat, add the oil and allow it to become hot.  Once it it hot, add the red and jalapeno peppers, broccoli, mushrooms, garlic and onions.  Cook, stirring often until the veggies are tender-crisp.  Set aside.
4.  In the bowl of a food processor, add the silken tofu, and the rest of the ingredients (all the spices) from the sea salt on.  Process until completely smooth and silky.  You can taste it, but remember that it will have a slightly funny texture from the uncooked arrowroot, used to thicken and hold together the quiche. 
5.  Pour the pureed tofu mixture into a large mixing bowl and add the sauteed veggies.  Fold everything together.  Place the vegetable/tofu mixture into the prepared potato crust.  Flatted the top with a rubber spatula.

The Vegetable/Tofu Mixture in the Potaoto Crust - Unbaked
6.  Place the quiche in the oven and bake at 350 degrees for about 45 minutes or until center is firm to the touch and top is golden in color.  Allow the quiche to cool for at least 10 minutes before serving or it will not cut nicely.  Serve!

Enjoy!

-K


Sunday, May 15, 2011

Vanilla Cupcakes with Strawberry Cream Cheese Frosting

Hey guys, before I get into this post, just wanted to let you know that there have been several problems with blogger this past week.  I did post a gluten free Wednesday post on Wednesday, then was not able to access blogger for 2 days.  When it was finally back, there was a notice saying that a lot of blog posts that were posted on Wednesday - my gluten free Wednesday blog post! - were removed, and that they would try to put them all back.  I of course immediately forgot about this and posted my blog post on Friday, when I then noticed that my post wasn't there from Wednesday!  So, to make a short story long, my post was removed during all of the work that was being done, and I will repost the same post this coming Wednesday. 

This was the idea of my former coworker M.  There was a point in the first few months of the year when the produce department was ordering too many strawberries, charging a ton, a obviously not selling nearly enough.  So, their strawberries were going bad fast.  And when they even begin to look wilty, they can't use them.  So, what to do, but give them to the bakery department.  We made pretty things there that used strawberries, right?  Sure, and we appreciated the strawberries as first, but it became pretty ridiculous pretty fast.  They would literally bring us a case a day - a case being about 24 one pound containers of organic strawberries that were on the verge of turning.  And you know how perishable strawberries are, right? 

We were desperately trying to think of things to make with the strawberries and M came up with the idea of a Strawberry Cream Cheese Frosting.  The Cream Cheese Frosting is by far the best frosting we have, and the additional of strawberries makes it out of this world!  So, she made a vanilla cupcake as the base, blended some fresh strawberries until they became a puree, then folded the strawberry puree into the prepared Cream Cheese Frosting and viola Strawberry Cream Cheese Frosting!  She put the frosting back into the cooler to set up, then frosted the cupcakes with the frosting and placed a fresh strawberry slice on each cupcake as a garnish. So beautiful!  Unfortunately, since this isn't my recipe, but rather Lifethyme's cupcake and frosting recipe and M's addition, I can't put the recipes here, but  you  can easily follow a traditional recipe for dairy cream cheese frosting and just substitute the butter for Earth Balance and the cream cheese for Tofutti Cream Cheese.  Easy.  And Tasty!  These can also easily be made gluten free by just making a gluten free vanilla base cupcake and following the above instructions/suggestions from the frosting.


Yummy!  Such fluffy frosting!


So Many!  But a Couple Are Missing!


Seriously Beautiful!

Enjoy the beautiful pictures!

-K

Friday, May 13, 2011

Burgers with Tater Tots

I've been feeling a lot like burgers lately.  I have been trying to tell myself that from now on I am going to make my own veggie burgers because they can get pretty damn expensive, but after making a trip to one of my favorite places May Wah!, I saw a package of these quite realistic looking burgers, which were on sale
(4 for $2.95!), I had to try them.  I wanted to get like four packages (that's the my Dad in me - seeing a deal and wanting to stock up), but since I have never tried them before, and we all know how veggie burgers can completely vary in flavor and texture, I decided on two packages.  And once Hubbs and I tried them for this meal, I am glad we only bought two.  Don't get me wrong, they're tasty, but they taste Exactly! like the vegan pepper steaks I buy from May Wah.  Kind of disappointing.  I kind of expected them to taste more meaty or something.  But once the burger was made up with all the fixings, you couldn't tell so much.  Loved the tater tots though!  Had them at a restaurant not too long ago, and it was the first time I've had them since I was a kid - such a tasty, fun thing!  When I was first trying to explain them to Hubby, he was just staring at me with this blank expression, but after he tried them, he fell in love and has asked for them about 10x since we had this meal!  Got to go back to Whole Foods at some point!

Burger with Tater Tots:


Burger on a Potato Bun & Tots!  (Gotta love 'em!)

Serves: as many as you would like to make!

Burgers
3 burgers, thawed
1 1/2 tablespoons olive oil
3 slices vegan cheese (daiya is awesome!)

3 Buns, toasted in oven

Tomato, Onion, Pepper Slices,
Pickles on the Side
Ketchup, Mustard & Mayo on the Buns

1/2 package frozen tater tots

1.  Preheat the oven to 425 degrees.  Place a piece of aluminum foil or parchment paper on a baking tray and place the frozen tater tots directly onto the tray.  Place in the oven and bake for about 25 minutes, moving them around a couple times in the oven so that all sides become crispy. 
2.  In the meantime, assemble all the burger ingredients: place all the sauces on the table, prep all the veggies and put those on a plate on the table. 
3.  Place a large pan over medium heat on the stove.  Add the 1 1/2 tablespoons olive oil in the pan and allow it to become hot. 

Scarily Looks like Real Meat, Right? 
It tastes suspiciously similar to vegan pepper steak!

Once the oil is hot, place the burgers in the oil and cook for about 3-4 minutes per side, or until heated through and nicely browned.  Place on paper towels to drain and pat off excess oil.  Top with the slices of cheese and allow to melt. 

4.  Place the buns in the oven for a couple minutes to become warm and toasty.
5.  Now your tots should be done, as well as everything else.
6.  Prepare your buns - slather with desired condiments and top with desired veggies.  Top with top bun, add some tots on the side and you're ready to dig in!
 

The Burger with all the fixings!

Enjoy!

-K


Sunday, May 8, 2011

Dominican Okra Stew

I really like okra.  I think it's one of those love it or hate it things though.  And I can tell you that I used to hate it.  There have been several of those kinds of foods in my past that I would definitely consider in the love it or hate it category, and that includes mushrooms, beets and cilantro.  At one point, up until relatively recently actually, I hated all of those things and now really appreciate them.  Especially okra.  The first time I ever had it was when I first came to nyc.  My group in culinary school was preparing for our final Friday Night Dinner, in which we had to create a (at the time) four course vegan meal to serve 100 people.  It was quite an undertaking, let me tell you. 

And I unfortunately don't remember the whole meal, just bits and pieces.  It was a kind of American meal - elements from each course representing different areas of the country.  The entree was a Southern style meal, including a BBQ Tempeh, Cornbread (my recipe of course!), some kind of chiffonnaded green and a pickled okra spear.  That was my first experience with okra.  There was a girl in the group who was part Russian and loved all kinds of pickled things, especially okra and wanted to include that into our meal.  Everyone was against it except her, but she was very firm about her desire to make it, even coming in by herself to pickle the okra several weeks before the dinner was to happen.

I remember her cracking open the jar and pulling out a spear, and the resulting slime that came slithering off almost made me vomit right there.  Then she took a bite, and a giant chunk of slime was hanging between her lips and the okra spear.  It was horrifying!  I absolutely did not want anything to do with it, and true to my expectations, it was quite a gooey bite. 

Fast forward to over a year later and my Hubby bringing a bag of okra home one day.  My look of horror upon seeing the bag of little green spears really amused him and he insisted that he would prepare a delicious dish with them.  I was extremely suspicious and really did not intend to even eat a single one, but the expectant look on his face made me stop and try it.  He simply steamed them, drizzled them with extra virgin olive oil and sprinkled them with sea salt.  It didn't look too horrible.  And when I bit into it ... there was hardly any sliminess.  He explained to me that when you overcook okra or pickle it is when it becomes very slimy.  I actually ate 5 okra spears.  And the next time he brought them home, I ate a ton of them and thoroughly enjoyed them!  Now I love to experiment with them all the time, and this is my latest delicious experiment.  And let me tell you, Hubby was right - the secret to making this not slimy is by not overcooking the okra.  Try it, seriously.  Yummy!

Molondrones Guisados (Okra Stew):


Nicely Spicy Stew - Quite Filling

Yields: 4-6 servings

2 tablespoons extra virgin olive oil
1 medium onion, 1/4'd and sliced, about 1 cup
1 green pepper, small diced, about 1 cup
1/2 orange pepper, small diced, about 1/2 cup
1 jalapeno pepper, minced
4 cloves garlic, minced
2 large tomatoes, medium diced, about 3 cups
2 cups okra, sliced into 1/4"-1/2" sliced
2 tablespoons tomato paste
3 small or 1 1/2 large boullion cubes
1/2 cup filtered water
1/4 teaspoon black pepper
1/4 teaspoon onion powder
1/4 teaspoon garlic powder
Cayenne pepper, as desired (I used 1/8 teaspoon)
1/2 teaspoon apple cider vinegar
Additional filtered water as needed

1.  In a large pot over medium heat, add the olive oil.  Once the oil is hot, add the green and orange peppers, onion, jalapeno pepper and minced garlic.  Cook for about 2-3 minutes, or until the ingredients are fragrant.
2.  Add the chopped tomato, tomato paste and sliced okra and stir together, cooking for an additional 5 minutes. 
3.  Add the boullion cubes, water, black pepper, onion and garlic powder, cayenne pepper and vinegar.  Stir everything together and lower heat.  Allow the stew to cook for about 15 minutes, stirring periodically and adding additional water as needed.  Cook until the okra can be pierced with a fork, but still has a bite.  This will decrease its slimy potential.  When okra is over cooked is when it becomes very slimy.

Serve with a slice of warm toasty bread to soak up any of the leftover juices!

Enjoy!

-K

Friday, May 6, 2011

Gluten Free Cooking Class - Park Slope

I love teaching.  It is extremely rewarding and allows me the opportunity to meet lots of people I otherwise wouldn't be able to meet.  I've been planning this gluten free cooking class for several weeks, coming up with ideas, creating and testing recipes and organizing everything.  I had the class, now a couple months back and it went really well - I think everyone enjoyed the experience and the food and had nice full bellies by the time the night was over.  The class was purchased by three friends for their good friend who recently was diagnosed as Celiac.  While she was in school, she was lucky to have her mother helping her learn and prepare foods.  Now that she is finished with her schooling and on her own, forced to cook for herself with her new way of life, she needs a little help getting started.  This is where I came in.  One of her friends contacted me via Facebook - we both laughed over the way of contact, and said she had heard about me from the NGI's website and was interested in the gluten free aspect, but not the baking aspect.  She was more interested in the cooking.  We spoke from there and I came up with a list of potential ideas, she chose which ones she would like, and off we were.
We had an entree, soup, salad and dessert.  3/4 of the dishes were vegan.  As the ladies in the class were not vegetarian, we prepared a chicken dish, but the sauce that we made with it can easily be served over seitan, baked marinated tempeh or tofu or any other kind of meat replacer.  I actually just ate some of the sauteed veggies in the sauce and was happy with that - it was very flavorful.

I think my favorite part of the meal was by far the soup.  I am a huge soup person and most of the time will eat a bowl of soup a day at work.  The soup was pretty easy to make, just a little labor intensive in regards to prepping all the veggies, but it really came together quite quickly once everything was prepped.  We even had some wine and Sangria to finish the meal with and I went home nice and happy.  It was great working with those ladies and it would be nice to meet up again.  I really hope the birthday girl (and Celiac) was able to learn something about gluten free cooking, to help her feel more confident as she learns more about new new way of life.

Some of the recipes were pretty involved and I don't want to post all of them.  I made the soup again a couple weeks back for Gluten Free Wednesday, so it is already posted.  I will just make a link to the Thai Vegetable Soup and write down the menu. 


Chicken in a Curried Coconut Sauce (Seitan or a Vegan Mock Chicken)
(Forgot to take a Picture!)


Thai Vegetable Soup with Sweet Potatoes and Coconut Milk


Thai Vegetable Soup with Fresh Basil as a Garnish

Quinoa Tabouli


Delicious & So Fresh!


Double Chocolate Walnut Cappuccino Brownies


Delicious Delicious Brownies.  So Rich and Dense!


(Remember, everything was gluten free!  And delicious!)


I am teaching some more private classes in the coming weeks, for a friend's sisters.  Those classes are lots of fun too because they are really open for pretty much anything - the girls are really open to everything and we always have a great time!


Enjoy!

-K

Wednesday, May 4, 2011

Gluten Free Wednesday: Twice Baked Potatoes Take 2

Happy Gluten Free Wednesday!

And happy twice baked potato day.  I seriously love twice baked potatoes!  They are so damn delicious and hit the spot every time!  I wish every day could be twice baked potato day!  But alas... Today I had to make lunch kind of in a hurry at work.  That is seeming to be the theme every week now, but that's ok.  So I went through a couple options with L and she chose twice bakes.  She would choose that any day of the week I think because she loves potatoes so much! Me too though!  So to make this, I simply prepared the potatoes, put them in the oven and forgot about them for an hour, which allowed me to continue baking and doing everything that needed doing in the bakery!  Once the potatoes were done, I simply mashed them and threw everything together.  Placed them in the oven for a little while to get hot and there was lunch!  Yum!  This might seem like a lot of potatoes, but believe me, everyone will most likely eat at least two, then keep the rest in the fridge for up to a week, reheat them, and there's dinner (with an added salad or other veggie of course!)  I brought the leftovers home and Hubby absolutely loved them - he ate four of them if you can imagine!

Twice Baked Potatoes:


Twice Baked Potato with Sauteed Garlic Kale


9 medium potatoes, scrubbed and poked all over with a fork
1/3 cup Earth Balance
1/2 cup vegan sour cream
2 teaspoons sea salt
3/4 teaspoon black pepper
2 teaspoons onion powder
2 teaspoons garlic powder
1/2 teaspoon chipotle pepper powder
1 Rapunzel boullion cube crushed with fingers

1/4 medium red onion, minced, about 1/3 cup
1/4 large red pepper, small diced, about 1/3 cup
6 pieces tempeh bacon, cooked and diced

1.  Preheat oven to 375 degrees. 
2.  Place the washed, pricked potatoes on a baking tray lined with parchment paper.  Bake for 45-60 minutes, or until easily pierced with a fork, depending on the size. 
3.  While potatoes are baking, prepare the filling ingredients.  Combine the Earth Balance and sour cream and set aside.  Combine all the spices, including the crushed boullion cube in a ramekin or small bowl and set aside.  Chop the onion, pepper and tempeh and set aside in a small bowl. 
4.  Once the potatoes come out of the oven, immediately slice them in half the long way.  Allow them to cool just until cool enough to handle.  Once they are cool enough to handle, scoop out as much of the baked potato as possible, leaving the peel and a small amount of potato intact.  Place the potato flesh in a large bowl and the shell back on the baking tray.  Continue to scoop all of the potatoes.
5.  Once all the flesh has been scooped from the potatoes, mash the potatoes with a potato masher until lump free.  Add the Earth Balance and sour cream and mix until the Earth Balance melts and is combined.  Add all of the spices and stir to coat.  Now add the chopped veggies and tempeh bacon.  Taste the potato mixture.  It should be creamy, a little spicy and very flavorful. 
6.  Place the seasoned potato mixture back into the shells, using your hands to mold the potatoes into a nice shape on top.  At this point you can add daiya or not.  We didn't have any daiya at work so we obviously didn't add it, but by all means do.  Place back in the oven for 15-20 minuter or until heated through.
7.  Serve.  Try to wait a couple minutes or it will burn your tongue - I know it's hard!


Close Up of the Delicious Potato & Bacony Goodness!

Enjoy!

-K

Sunday, May 1, 2011

Mashed Potatoes, Pepper Steak, Sesame Kale and Steamed Okra

I was really hungry tonight and wanted something that would really fill me up.  What better way to do that than through "meat" and potatoes?  I thought so!  This meal was really great too because it came together pretty quickly, which is what Hubbs and I wanted.  I love potatoes in any form, so this really hit the spot and I had a bunch of kale and okra (my recent favorite!) in the fridge.  The pepper steak was leftover from a recent gluten free Wednesday.  It was seriously sooo delicious, the pepper steak being the best part.  And just to clear up any confusion, vegan pepper steak is supposed to taste similar to meat pepper steak, made from beef, but it is more similar in color and flavor to chicken, so even though it is technically called pepper steak, I always refer to it as chicken.  So, enjoy the delicious meal, we definitely did!

Mashed Potatoes, Pepper Steak, Sesame Kale & Okra:


Sesame Kale, Crispy Pepper Steak, Fresh Okra and
 Buttery Mashed Potatoes
 
Super Simple Mashed Potatoes:
5 medium potatoes, peeled and diced
3 tablespoons earth balance
1/2 cup potato cooking water, or as needed
1/2 teaspoon sea salt
1/4 teaspoon black pepper

Sesame Kale:
1/2 bunch kale, thick stems removed and leaves sliced
4-6 cloves garlic, minced
1 tablespoon sesame seeds
1 1/2 tablespoons shoyu or tamari
1/2 teaspoon red pepper flakes

Okra:
2 dozen okra spears
1 1/2 tablespoons extra virgin olive oil
sea salt, to taste

2 Prepared Pepper Steaks, thawed and pan fried

1.  This meal comes together quite quickly.  The first thing you want to do is start the potatoes - they will take the longest. 
2.  Place peeled and diced potatoes in a medium pot over medium heat, covered with lukewarm water. Bring to a boil and allow to cook until easily pierced with a fork.
3. Drain the potatoes, reserving 1 cup of the potato cooking liquid.
4. Place the drained potatoes back in the pot and add the earth balance. Mash with a potato masher until desired texture is achieved. Add the 1/2 cup potato cooking water, sea salt and black pepper, mashing until all the ingredients are incorporated. Add more potato water as needed.
5. Place lid back on potatoes to keep warm as finishing remaining components of meal.
6.  In the meantime, bring a medium pot of water to a boil.  This water will be used to blanch the kale and cook the okra.
7.  Submerse the kale in the water for about 1 minute, or until bright green and tender. Use a pair of tongs or a slotted spoon to remove the kale from the water and place in a colander in the sink to drain. Do not dump out the water. You are going to use the water to cook the okra.
8.  While the kale is draining, add the okra to the pot and cook until just tender, about 3 minutes.  Once cooked, drain.  You are finished with the water at this point.
9.  In a medium saute pan or a wok over medium-high heat, add the olive oil and allow it to warm. Once it is warm, add the garlic and cook until fragrant and golden, about 1 minute. Add the drained kale and stir immediately. It will sizzle and pop - be careful.
10. Add the sesame seeds and red pepper flakes and toss to coat. Add the shoyu/tamari and toss to coat, seasoning to taste.
11.  To finish the meal, once the okra has been drained, drizzle with the olive oil and sprinkle with the sea salt to taste.
12.  To serve, place a serving of each of the items on your plate and top the potatoes with additional earth balance if desired.

Enjoy!

-K