So, today my Hubby left for his home country for a few weeks, and to keep my mind off missing him, I have been trying to keep myself extremely busy. After I dropped him off at the airport, I went right to work, about 2 hours early, and when work was finished, immediately went to teach the vegan baking basics class. I spent a couple hours over what we were supposed to spend, which was great, and allowed us to make a lot of things. Everything turned out so beautifully and the cakes that the ladies iced turned out beautifully! Plus, everyone had so much fun, making everything worth it.
Here is a list of all the things we baked:
Red Velvet Cake with Buttercreme Frosting (See Picture Below)
Double Chocolate Fudge Cake with Chocolate Frosting:
 |
| Decorated Courtsey of J! |
Lemon Cake with Coconut Frosting:
 |
| Decorated Courtesry of R! |
Cheesecake with a Walnut Oat Crust:
 |
| Delicious! Was too hot to take out of pan. |
Tiramisu!:
 |
| Two Layers of Coffee Syrup Dipped Cake, Two Layers of Creme, and Cocoa |
Strawberry Shortcake (forgot to take picture)
Vanilla Blueberry Loaf with Streusel Topping:
 |
| So Soft and Moist with Bites of Fresh Berries! |
Decorating Techniques:
 |
| Different Piping/Decorating Techniques. |
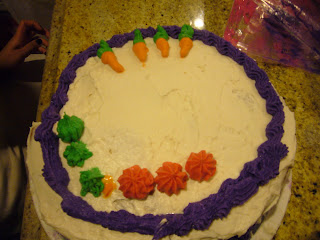
Everything turned out beautifully! I am just going to post one recipe, otherwise we would be here all day! Here is the recipe for the Red Velvet Cake with Buttercreme Frosting:
 |
| Red Velvet Cake with Different Fun Decorating Techniques. A little overboard I know! |
Cake:
3 1/2 cups unbleached flour
2 teaspoons baking soda
1 teaspoon sea salt
1/4 cup cocoa powder
1/2 cup maple syrup
1/2 cup agave
1 1/2 cups soymilk or other preferred nondairy milk
2/3 cup canola oil
1 1/2 tablespoons apple cider vinegar
1 tablespoon vanilla extract
1 1/2 teaspoons red food coloring, or as desired
Frosting:
1 cup organic non-hydrogenated vegetable shortening
3 cups florida crystals powdered sugar
1 tablespoon vanilla extract
1/4 cup soymilk or preferred nondairy milk
1. Preheat oven to 350 degrees. Generously oil 3 8" round cake pans. Set aside.
2. Prepare the cake first: in a large bowl, place all the dry ingredients: flour, baking soda, sea salt and cocoa powder. Whisk until all ingredients are combined.
3. In the center of the dry ingredients, place all of the wet ingredients: maple syrup, agave, soymilk, oil, cider vinegar, vanilla extract and red food coloring.
4. Whisk until all the ingredients are well incorporated and a smooth, thick batter forms. Remember to be careful when working with food colorings, as they can stain hands and clothing.
5. Evenly divide the batter between the three pans, using measuring cups if necessary. Twirl the pans until the cake batter is evenly distributed throughout the pans.
6. Bake the cakes for 20-25 minutes, or until a toothpick inserted into the center comes out clean and the top springs back when lightly touched.
7. Allow the cakes to cool in their pans for about 10 minutes. Remove the cakes from their pans and continue cooling on cooling racks until they are cool all the way through.
8. In the meantime, prepare the icing. In a medium bowl, place the shortening. With a hand mixer set on medium speed, mix the shortening until light and fluffy, about 2 minutes. Add the vanilla extract and nondairy milk and mix on low speed until incorporated and fluffy again.
9. Add in the 3 cups of sifted powdered sugar and over low speed, mix until all the sugar is incorporated. The frosting should be light and fluffy. Set aside until ready to use - this frosting should not be refrigerated until the cake has been iced or it will firm up too much.
10 Ice the cake as desired, stacking the layers one on top of another. Decorate as desired. Delicious and beautiful!
 |
| The Spread. A nice job (and fun time) overall. |
Enjoy!
-K
No comments:
Post a Comment