Wednesday, October 31, 2012

Almond Cookies

These are some tasty cookies based off a recipe I used to bake when I worked at Lifethyme Market in Manhattan.  They are slightly different than the ones from Lifethyme, but are equally delicious and pretty with the whole almond smack dap in the middle of the cookie and little pieces of almonds throughout the batter, giving the cookie a rich, almost buttery flavor.  Yum!  This cookie uses something interesting that I call almond sugar, which is simply whole almonds ground together with organic sugar, which is then stored in either the refrigerator or freezer to keep it fresh.  The reason behind grinding the almonds with the sugar is so that the almonds can become nice and finely ground without becoming a paste or a butter, which is what happens when you blend almonds by themselves for too long in a food processor.  Even though I literally just made these, they are already gone and I want to make them again.  They are Hubby's favorite cookie, and he goes through these funny phases where he will ask me every other day to make cookies, then will only eat 2-4 of them.  Whenever I make these though, I have to be sure to grab a couple before he gets to them or I won't be enjoying them at all. 

Almond Cookies


(Yields 12-14 Cookies)

2 cups unbleached flour
1/2 cup almond sugar (see below)
1/2 teaspoon baking soda
1/4 teaspoon sea salt
1/3 cup filtered water
1 1/2 tablespoons ground flax seeds
1/2 cup canola oil
1 tablespoon vanilla extract
2 1/2 teaspoons almond extract
whole almonds, for garnish

Almond Sugar: (makes more than the 1/2 cup called for in the recipe - just store the rest)
1 1/4 cups organic sugar
1 cup whole almonds

1.  Prepare the almond sugar first: in the bowl of a food processor, add the almonds and sugar and process until the almonds and sugar are well combined and no pieces of the almonds remain.  Set aside.
2.  Preheat the oven to 350 degrees and line a couple baking sheets with parchment paper.  Set aside until ready to use.
3.  Into a medium sized mixing bowl, add the flax seeds and filtered water, whisking until well combined.  Add the almond sugar, canola oil, vanilla and almond extracts.  Whisk together until very well combined.
3.  Into the bowl, add the flour, baking soda and sea salt.  Stir together with a spatula until a thick batter forms. 
4.  Use desired portion scoop to scoop out the cookies.  I prefer a black #30 scoop for cute cookies.  Leave a couple inches between the cookies.  Top each cookie with a whole almond in the center and press down slightly.
5.  Depending upon the size of the portion scoop used, bake for about 12-15 minutes (longer for larger scoops), or until the top is firm and cooked all the way through.
6.  Transfer to a cooling rack right away by removing the entire piece of parchment and placing it on the cooling tray.  That's it!

Enjoy!

Koko

Thursday, October 25, 2012

Vegan Shrimp Sushi

Sometimes my husband really surprises me with the food items he likes and really wants me to cook for him.  Of course, being Dominican, most of the time he craves Spanish food.  Which is great for me, because I love learning about his food and culture.  But he has been on this sushi kick lately, which is just very funny to me.  I'm not even sure where he tried it the first time, but I decided to make it once and he ate like literally 4 whole rolls of it.  I was stunned, even more so when several weeks later, asking him what he wanted for dinner, his response was "sushi".  Hmm.  I'm very glad he likes it because it is such fun making and of course eating!  It is also such a pretty procedure, and I have never taken pictures of the process, which I thought would be fun this time around.  So, enjoy the nice pictures and make some.  It is sooo delicious.  Maybe I'll make it again for dinner tomorrow!


Vegan Shrimp Sushi:


Topping the nori with the seasoned rice.

Seasoned Rice:

1 1/2 cups sushi rice
3 cups filtered water

4 tablespoons rice vinegar
1 1/2 tablespoons agave
1/4 teaspoon sea salt

Suggested Fillings:
peppers
scallions
vegan shrimp
carrot shavings

Suggested Toppings:
pickled ginger
shoyu or tamari
wasabi paste


1.  Rinse the rice well.  Place in a saucepan with the water and bring to a boil over medium heat.  Once the water boils, lower flame to low and place the lid on top of the pot, with a small space for the air to vent.  Cook rice till completely cooked through, about 15 minutes. 
2. Once the rice has cooked and the flame has been turned off for about five minutes, add the rice vinegar, agave and sea salt.  Stir well to coat.
3.  Allow the rice to cool slightly.  I like to use it when it is still warm, but not hot, or it will kind of "melt" the nori. 
4.  Place about 1 cup of the prepared sushi rice in the middle of the nori, and press out with dampened hands, leaving about 1" from the top without rice.  Place goodies like veggies and vegan shrimp in the center of the rice, being careful not to overload even though it may be almost impossible not to. 
5.  Roll the nori roll tightly toward the end, sealing the nori with some water. 
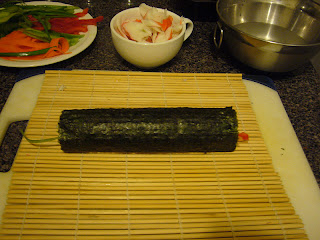
6.  Place the nori seam-side down while preparing the rest of the rolls.  Using a sharp knife, slice the nori into bite sized pieces, wiping off the knife after every pass through the roll.
7.  Arrange on a plate and garnish with your favorite toppings.  


The giant mound of rice & all the goodies ready to go.


Rice pressed out, about 1" bare at the top.


The veggies and vegan shrimp


Beautifully rolled up!


Sliced, Topped with wasabi & pickled ginger.  Yum!!


Enjoy!

Koko

Sunday, October 7, 2012

Caramelized Onion & Eggplant Marinara over WW Spaghetti, Garlic Sauteed Green Beans, Garlic Bread & Salad

I have a ridiculously huge collection of cookbooks.  Just ask my husband.  Really.  It's kind of out of control.  I go on Amazon shopping sprees once or twice a year and buy all the fun new vegan and/or gluten free cookbooks out there.  And when I moved from Michigan to NY over five years ago, I brought them all here with me.  And I'm sure I have at least doubled the amount I had when I came here.  It's crazy.  It's my unrealistic and improbable goal to make all of the recipes out of most of the best of the cookbooks.  I have made many out of the cookbook Vegan Yum Yum by Lauren Ulm and have had pretty good results.  This is one of the recipes I made out of the cookbook with tasty results.  It was very interesting and tasty, although I definitely prefer my homemade marinara sauce.  Still it was a fun experiment, and another recipe from the book down.

Caramelized Onion & Eggplant Marinara:


Hubby's Tasty plate.  Lucky guy!

2 eggplants, peeled, cut into discs, then into strips
1 teaspoon sea salt, for sprinkling on eggplant
1/3 cup olive oil
1 medium vidalia onion, sliced into strips
3 cloves garlic, minced
1/2 teaspoon dried thyme
1/2 teaspoon dried basil
1/2 teaspoon dried oregano
28 ounce can pureed tomatoes
1/4 teaspoon black pepper
1 teaspoon sea salt

1.  Preheat oven to 400 degrees. 
2.  Line a sheet tray with two layers of paper towels.  Spread the discs of eggplant on top of the paper towels, stacking in layers if necessary.  Sprinkle all of the eggplant with the sea salt.  Let the eggplant sweat for a while, about 15 minutes, then remove the damp paper towels.
3.  Drizzle the eggplant with 1/4 cup of the olive oil and toss to coat.  Place in the oven and cook for 20 minutes, stirring periodically.
4.  Add 1 tablespoon of the olive oil to a large saute pan oven medium high heat.  Once the pan is hot, add the onion and cook, stirring periodically until it has a nice golden color, about 10 minutes. 
5.  Add the garlic and spices: thyme, basil, oregano, sea salt and black pepper.  Cook for about a minute, stirring frequently.  Add the tomato puree and stir well.
6.  Check on the eggplant.  It should be nicely cooked, soft and browned.  Add to the sauce and stir to coat.  Allow the sauce to simmer for 15 minutes, stirring periodically.  Season to taste.
7.  Serve over cooked pasta.


Close-up of the tasty, chunky sauce


Enjoy!

Koko