Sunday, December 30, 2012

Gluten Free Coconut Cashew Truffles

We have been talking at work about truffles lately.  We already have a chocolate truffle.  But admittedly,  it is one of the previous baker's recipes and is really not good or tasty.  (It is also not allergy friendly because it contains soy, chocolate, gluten and nuts.)  But, if there is one thing I have learned since being in this position,  it is that our customers do not like current items changed.  We tried to change the tiramisu (the old baker used stale muffins as the base, lemon tofu creme, then drizzled the entire thing with chocolate - does this sound like tiramisu?  God no!),  and all the customers rebelled and freaked out.  So we are back to the lemon creme tiramisu, although not with the stale muffins because we have more class than that! 

Anyway, we've decided not to change the truffle recipe, but I definitely want to do a white truffle.  White chocolate would obviously be the best thing ever, but it is extremely difficult to find a vegan white chocolate and very very expensive.  So, beautiful idea, but not realistic.  Moving on.  Then I came up with the idea of using cashew and coconut.  A cashew coconut truffle?  Interesting sounding, but would it be tasty?  Hmm - onto the testing.  It took me a good 3 tries to get the consistency right, but in the end it worked out and is so delicious!  One batch made 70 and I brought out as I was walking out the door.  When I came in the next morning, I couldn't find them anywhere and was convinced that someone had dropped the tray on the floor and thrown them away.  After asking around, I discovered they all sold within 3 hours - 70 truffles in 3 hours!  Yes, they're that damn good!

Coconut Cashew Truffles:


Melt on Your Tongue Delicious!

Yields 30 mini truffles

1 1/2 cups cashews, soaked
3/4 cup young coconut flesh, chopped
1/2 cup + 2 tablespoons agave
1 1/2 cups coconut oil, melted (refined is best)
1/4 teaspoon sea salt
1/2 vanilla bean, deseeded

1.  Drain the water from the cashews and discard.  Make sure all the ingredients are room temperature or warmer.  If anything is cold, it will cause the coconut oil to solidify and this mixture will not blend at all. 
2.  Place all ingredients in the bowl of a food processor and blend until completely smooth and silky.  It will be very glossy looking and a little stretchy from the coconut. 
3.  Place in a rectangular container, cover tightly with plastic wrap and allow to refrigerate 4 hours to overnight. 
4.  The following day when you want to portion these out, allow the mixture to sit out for about 5-10 minutes to soften slightly - it will be impossible to start scooping them out right away.  Use a mini ice cream scoop/portion scoop and scoop them onto a plate lined with shredded coconut.  Once you have scooped a good amount, use your hands to roll them into uniform shaped balls and roll in the coconut right away. 
5.  Once you have finished portioning and rolling all the truffle balls, place them in the refrigerator and store them there. But, first you have to pop a whole one in your mouth and sigh in bliss!  So amazing!

Enjoy!

-Koko

Wednesday, December 19, 2012

Gluten Free Arepa and Dominican-Style Hot Chocolate

My husband doesn't cook a lot, but when he is really in the mood to do so, look out!  I love it when he comes up with ideas from his home in the Dominican Republic and recreates them using the ingredients I would prefer we use.  The recipe he made for the arepa ended up making a huge 9x13" pan, and for only two people, we were eating it for over a week, but we didn't complain at all!  It was crazy delicious!  Now, arepa is a dish that is traditionally prepared over an open fire and eaten for breakfast, so it is not super sweet, which makes me happy.  I am not into the overly sweet dishes.  Now, admittedly, watching my husband in the kitchen is a little painful sometimes, seeing how he uses my expensive knives and pots, or chooses to use a tool that is not super efficient, but I keep my mouth closed and end up smiling in the end when I see how happy he is and how amazing and delicious the food turns out. 

Unfortunately, I do not have a recipe for this at the moment, because my hubby  never ever measures anything and thinks I am hilarious for measuring everything.  Next time, I will stand over his shoulder and estimate everything he puts in there.  It is the exact same way I learned to make Dominican beans from his cousin Wady, who barely speaks a word of English, and my Spanish is certainly nothing to get excited about.  Wady taught me how to make the beans speaking Spanish, which I could understand maybe every other word, and also didn't measure anything, so I stood over under his shoulder, seeing as he is 6'5" tall, and estimated the amounts of everything he was adding.  And damned if it didn't turn out so so close when I made it by myself the next time.  So, to make a short story long, next time Hubbs makes this, I'll write it down and post it.  I will write up a list of the ingredients I can remember that he put in there, but I will come back with a tasty recipe soon.  The recipe for the Dominican-Style hot chocolate is below.


Dominican-Style Hot Chocolate and Arepa

Dominican-Style Hot Chocolate:

8 ounces non-dairy milk or water (definitely better with the milk!)
pinch cinnamon
3-4 tablespoons organic sugar
2 1/2 tablespoons cocoa powder, sifted

1.  Place the non-dairy milk or water in a small pot and bring to a simmer.
2.  Place the cinnamon, sugar and cocoa powder in a small bowl and whisk to combine, making sure there are no lumps.
3.  Add the cocoa mixture to the simmering milk/water and whisk very well to combine.
4.  Allow the hot cocoa to cool for a couple minutes before enjoying.


The Amazing gf Arepa

Ingredients for Arepa (that I can remember):

corn meal
organic sugar
whole cinnamon sticks
fresh nutmeg, grated
whole cloves
pinch sea salt
Michigan cherries (sent to us by my mum!)
coconut milk
almond milk/ soy milk (I can't remember which one)

Until I can figure out the recipe from him!

Enjoy,

Koko

Friday, November 30, 2012

Sauteed Snap and Snow Peas with Cashews

This is a really tasty, easy stir-fry (which I never make enough of!) recipe I found in Vegetarian Times.  I have been getting that magazine for so many years and even though I find myself oohing and aahing over so many of the pictures and recipes, I find that I rarely actually make any of the recipes, which drives my husband crazy.  After all, my hundreds of cookbooks are taking up so darn much space, I should be doing something with them, right??  Anyway, so I had several of these ingredients on hand already and it was a snap to come together.  Simple and tasty over some steamed rice.  Since my Hubbs isn't the biggest fan of brown rice, we did white rice.  I loved the idea of the cashews in the stir-fry, because I always see recipes and items on menus with cashews in them, but never think to order them or make them, not sure why, but I just never do.  Try this simple, quick, veggie-full dinner and have lots of time to do other things - like baking, what I'm doing now!  Yum!

Sauteed Snap and Snow Peas with Cashews:


So pretty, right?


Serves 4

1 tablespoon tamari
1 tablespoon toasted sesame oil
2 teaspoons arrowroot
1/4 teaspoon sriracha
2 pinches black pepper
1/4 teaspoon sea salt

1 tablespoon olive oil
1 medium red onion, julienned, about 1 cup
1 yellow bell pepper, julienned, about 1 cup
1 cup raw cashews
1 tablespoon fresh grated ginger
8 oz. sugar snap peas
8 oz. snow pea pods
8 green onions, cut into 1" pieces

Steamed white or brown rice to serve

1.  Whisk together the tamari, toasted sesame oil, arrowroot, sriracha, black pepper, sea salt and 1/2 cup filtered water into a small bowl.  Set aside.
2.  Heat the olive oil in a wok over high heat and add the onion, pepper, cashews and ginger.  Stir-fry for about 3 minutes, or until the onion and cashews begin to brown.
3.  Add the snap peas and stir-fry for one minute. 
4.  Add the snow peas and green onions.  Stir fry for 2-3 minutes.
5.  Add the sauce mixture and cook 1-2 minutes, stirring continuously, until the sauce has thickened and the vegetables are well coated with the sauce. 
6.  Serve over white or brown rice with additional tamari, if desired. 


Close Up of the Tastiness!  I loved the cashews!


Enjoy!

-Koko

Sunday, November 25, 2012

Giant Colorful Salad & a Ridiculous Amount of Pies

Sometimes I just don't have the energy.  For anything, especially cooking.  This past week has been completely insane at work.  My department is severely understaffed and cannot seem to retain the final person that will make everyones' lives easier.  Because of that, I was forced to make the pies for Thanksgiving all alone - one person preparing 210 standard size pies by themselves in three days.  Yes, 3 days, 30 hours, with only a small 2-rack half-sheet convection oven that cooks 200 degrees too hot and an ancient 2-rack full-sheet conventional oven that requires constant turning of the pans in order to not burn whatever is cooking inside.  This all amounted to a grand total of 5 pies cooked per hour.  Do the math - it was an impossible feat that almost killed me.  Because on top of making all the pies, I had to do inventory, ordering, covering breaks and all the rest of the stuff I usually do, all while getting over a terrible cold.  Very not cool.  Seriously.  It had me reevaluating how much longer I intent to stay working at this place.  February 1st will be one year, and that's what I was shooting for, but we'll see.  I still have to take my vacation, which was approved over a month ago, but was not able to be taken because of being so understaffed.  Sigh. 

Anyway, done with all this complaining.  All this means is that I had zero time or energy to focus on cooking anything, and since I was recovering from a terrible bout of fever and sore throat, I didn't have a strong appetite at all.  So a simple salad drizzled with olive oil and lemon juice, and sprinkled with sea salt and black pepper was all it took for me.  I had a package of heirloom cherry tomatoes that needed to be used up in the fridge, and I love cherry tomatoes, just not the weird explosion they make in your mouth when you eat them, so I cut them all in half (my one weird picky habit), added some julienned carrots and used my simple dressing.  Simple, stress free, easy.  Let's hope the next couple weeks heading to Christmas are less stressful.  *Fingers crossed*


My gorgeous simple, colorful salad


Mixed Green Salad

Mixed Greens
Julienned Carrots
Heirloom Cherry Tomatoes, halved
Dressing as desired.

Toss all ingredients together, add dressing and toss to coat.  That's it.  Eat.  Feel happy, light and stress free.


Koko

Wednesday, November 14, 2012

Spicy Black Bean & Quinoa Stuffed Peppers

I love me some stuffed peppers!  I ate these many times growing up and have thought about them over the years, but it never really went beyond simply thinking about them.  They were naturally meat filled (beef), so I couldn't get over thinking about using a soy substitute, but that didn't really sound all that appetizing to me.  I love beans (hubbs loves beans) and I love love quinoa (hubbs tolerates it but says it's too vegan - insert roll of eyes), so I thought about doing a black bean, quinoa stuffed pepper.  To keep it from being bland, I added some ground chipotle pepper powder and some other tasty peppers and they turned out amazingly!  So yummy and the pepper texture was just as I remembered it as a kid - firm enough to hold up, yet soft enough to be cut with a fork. 

They were really great and pretty quick, since I have been in the habit lately of cooking beans in large batches and freezing them in bags or plastic containers, then thawing them as I need them. I usually put 1-2 cups of cooked, drained beans in plastic bags, label them and freeze them flat.  Sometimes I will reserve the cooking liquid and place some beans in plastic deli containers, label and freeze them as well.  I use these for cooking Dominican beans.  Using the cooking liquid is the secret to having a thick sauce with the beans, and it gives them a lot of flavor as well.  Not to mention when the hubbs gets hungry and wants beans, all I have to do is thaw out the beans, add my seasoning, simmer and we have dinner in the amount of time it takes for the rice to cook.  Easy and delish!


The uncooked peppers stuffed with the quinoa/bean mix


Serves: 4-5

4 assorted color peppers, top removed and all insides taken out
2 cups cooked quinoa
1 cup cooked black  beans
3 chipotles in adobo sauce, chopped finely
1/2 teaspoon onion powder
1/2 teaspoon garlic powder
1/4 teaspoon black pepper
1/8 teaspoon cayenne pepper
2 teaspoons boullion powder
1 tablespoons olive oil
1/2 cup shredded carrots
1/2 small red onion, small diced, about 1/2 cup
3 cloves garlic, minced
Pepper tops, chopped
1 jalapeno, seeded and small diced
Fire roasted tomatoes with chipotles, to top peppers


1.  Preheat the oven to 375 degrees.  Place an 8" square baking pan on the stove and fill with 1/2" water.  Set aside until ready to  use.
2.  In a medium saute pan over medium heat, add the olive oil and allow it to become hot.  Add the shredded carrots, onion, garlic cloves, tops of peppers and jalapeno pepper.  Saute, stirring frequently for about 5 minutes, or until softened.
3.  In  the meantime, in a large mixing bowl, add the cooked quinoa and black  beans, the chipotles in adobo sauce, the spices (onion and garlic powder, black and cayenne peppers and boullion powder).  Add the cooked veggies and stir the mixture to coat. 
4.  Taste - it should taste a bit on the over-spicy side, but that's ok - it will mellow as it cooks.
5.  Fill the peppers with the stuffing, pressing down firmly to ensure the filling will not come out as it cooks.  Place the stuffed peppers into the prepared baking pan.  If the peppers have a tendency to tip over, prop them up with the other peppers.
6.  Cover the peppers with aluminum foil and bake for 35 minutes. 
7.  After the 35 minutes, remove the foil and top each pepper with a couple tablespoons of the fire roasted chipotle tomatoes. 
8.  Return the peppers to the oven without the foil and bake for an additional 5-10 minutes.
9.  Allow the peppers to cool for at least 10 minutes, then serve. 


Topped with fire roasted tomatoes


Dinner - stuffed pepper and a simple mixed green salad

Enjoy!


-Koko

Wednesday, October 31, 2012

Almond Cookies

These are some tasty cookies based off a recipe I used to bake when I worked at Lifethyme Market in Manhattan.  They are slightly different than the ones from Lifethyme, but are equally delicious and pretty with the whole almond smack dap in the middle of the cookie and little pieces of almonds throughout the batter, giving the cookie a rich, almost buttery flavor.  Yum!  This cookie uses something interesting that I call almond sugar, which is simply whole almonds ground together with organic sugar, which is then stored in either the refrigerator or freezer to keep it fresh.  The reason behind grinding the almonds with the sugar is so that the almonds can become nice and finely ground without becoming a paste or a butter, which is what happens when you blend almonds by themselves for too long in a food processor.  Even though I literally just made these, they are already gone and I want to make them again.  They are Hubby's favorite cookie, and he goes through these funny phases where he will ask me every other day to make cookies, then will only eat 2-4 of them.  Whenever I make these though, I have to be sure to grab a couple before he gets to them or I won't be enjoying them at all. 

Almond Cookies


(Yields 12-14 Cookies)

2 cups unbleached flour
1/2 cup almond sugar (see below)
1/2 teaspoon baking soda
1/4 teaspoon sea salt
1/3 cup filtered water
1 1/2 tablespoons ground flax seeds
1/2 cup canola oil
1 tablespoon vanilla extract
2 1/2 teaspoons almond extract
whole almonds, for garnish

Almond Sugar: (makes more than the 1/2 cup called for in the recipe - just store the rest)
1 1/4 cups organic sugar
1 cup whole almonds

1.  Prepare the almond sugar first: in the bowl of a food processor, add the almonds and sugar and process until the almonds and sugar are well combined and no pieces of the almonds remain.  Set aside.
2.  Preheat the oven to 350 degrees and line a couple baking sheets with parchment paper.  Set aside until ready to use.
3.  Into a medium sized mixing bowl, add the flax seeds and filtered water, whisking until well combined.  Add the almond sugar, canola oil, vanilla and almond extracts.  Whisk together until very well combined.
3.  Into the bowl, add the flour, baking soda and sea salt.  Stir together with a spatula until a thick batter forms. 
4.  Use desired portion scoop to scoop out the cookies.  I prefer a black #30 scoop for cute cookies.  Leave a couple inches between the cookies.  Top each cookie with a whole almond in the center and press down slightly.
5.  Depending upon the size of the portion scoop used, bake for about 12-15 minutes (longer for larger scoops), or until the top is firm and cooked all the way through.
6.  Transfer to a cooling rack right away by removing the entire piece of parchment and placing it on the cooling tray.  That's it!

Enjoy!

Koko

Thursday, October 25, 2012

Vegan Shrimp Sushi

Sometimes my husband really surprises me with the food items he likes and really wants me to cook for him.  Of course, being Dominican, most of the time he craves Spanish food.  Which is great for me, because I love learning about his food and culture.  But he has been on this sushi kick lately, which is just very funny to me.  I'm not even sure where he tried it the first time, but I decided to make it once and he ate like literally 4 whole rolls of it.  I was stunned, even more so when several weeks later, asking him what he wanted for dinner, his response was "sushi".  Hmm.  I'm very glad he likes it because it is such fun making and of course eating!  It is also such a pretty procedure, and I have never taken pictures of the process, which I thought would be fun this time around.  So, enjoy the nice pictures and make some.  It is sooo delicious.  Maybe I'll make it again for dinner tomorrow!


Vegan Shrimp Sushi:


Topping the nori with the seasoned rice.

Seasoned Rice:

1 1/2 cups sushi rice
3 cups filtered water

4 tablespoons rice vinegar
1 1/2 tablespoons agave
1/4 teaspoon sea salt

Suggested Fillings:
peppers
scallions
vegan shrimp
carrot shavings

Suggested Toppings:
pickled ginger
shoyu or tamari
wasabi paste


1.  Rinse the rice well.  Place in a saucepan with the water and bring to a boil over medium heat.  Once the water boils, lower flame to low and place the lid on top of the pot, with a small space for the air to vent.  Cook rice till completely cooked through, about 15 minutes. 
2. Once the rice has cooked and the flame has been turned off for about five minutes, add the rice vinegar, agave and sea salt.  Stir well to coat.
3.  Allow the rice to cool slightly.  I like to use it when it is still warm, but not hot, or it will kind of "melt" the nori. 
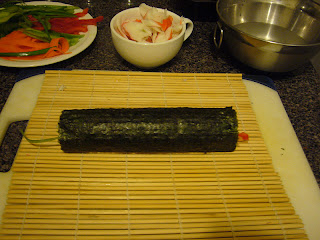
4.  Place about 1 cup of the prepared sushi rice in the middle of the nori, and press out with dampened hands, leaving about 1" from the top without rice.  Place goodies like veggies and vegan shrimp in the center of the rice, being careful not to overload even though it may be almost impossible not to. 
5.  Roll the nori roll tightly toward the end, sealing the nori with some water. 
6.  Place the nori seam-side down while preparing the rest of the rolls.  Using a sharp knife, slice the nori into bite sized pieces, wiping off the knife after every pass through the roll.
7.  Arrange on a plate and garnish with your favorite toppings.  


The giant mound of rice & all the goodies ready to go.


Rice pressed out, about 1" bare at the top.


The veggies and vegan shrimp


Beautifully rolled up!


Sliced, Topped with wasabi & pickled ginger.  Yum!!


Enjoy!

Koko

Sunday, October 7, 2012

Caramelized Onion & Eggplant Marinara over WW Spaghetti, Garlic Sauteed Green Beans, Garlic Bread & Salad

I have a ridiculously huge collection of cookbooks.  Just ask my husband.  Really.  It's kind of out of control.  I go on Amazon shopping sprees once or twice a year and buy all the fun new vegan and/or gluten free cookbooks out there.  And when I moved from Michigan to NY over five years ago, I brought them all here with me.  And I'm sure I have at least doubled the amount I had when I came here.  It's crazy.  It's my unrealistic and improbable goal to make all of the recipes out of most of the best of the cookbooks.  I have made many out of the cookbook Vegan Yum Yum by Lauren Ulm and have had pretty good results.  This is one of the recipes I made out of the cookbook with tasty results.  It was very interesting and tasty, although I definitely prefer my homemade marinara sauce.  Still it was a fun experiment, and another recipe from the book down.

Caramelized Onion & Eggplant Marinara:


Hubby's Tasty plate.  Lucky guy!

2 eggplants, peeled, cut into discs, then into strips
1 teaspoon sea salt, for sprinkling on eggplant
1/3 cup olive oil
1 medium vidalia onion, sliced into strips
3 cloves garlic, minced
1/2 teaspoon dried thyme
1/2 teaspoon dried basil
1/2 teaspoon dried oregano
28 ounce can pureed tomatoes
1/4 teaspoon black pepper
1 teaspoon sea salt

1.  Preheat oven to 400 degrees. 
2.  Line a sheet tray with two layers of paper towels.  Spread the discs of eggplant on top of the paper towels, stacking in layers if necessary.  Sprinkle all of the eggplant with the sea salt.  Let the eggplant sweat for a while, about 15 minutes, then remove the damp paper towels.
3.  Drizzle the eggplant with 1/4 cup of the olive oil and toss to coat.  Place in the oven and cook for 20 minutes, stirring periodically.
4.  Add 1 tablespoon of the olive oil to a large saute pan oven medium high heat.  Once the pan is hot, add the onion and cook, stirring periodically until it has a nice golden color, about 10 minutes. 
5.  Add the garlic and spices: thyme, basil, oregano, sea salt and black pepper.  Cook for about a minute, stirring frequently.  Add the tomato puree and stir well.
6.  Check on the eggplant.  It should be nicely cooked, soft and browned.  Add to the sauce and stir to coat.  Allow the sauce to simmer for 15 minutes, stirring periodically.  Season to taste.
7.  Serve over cooked pasta.


Close-up of the tasty, chunky sauce


Enjoy!

Koko

Wednesday, September 26, 2012

Spicy Chorizo Calzones

Sometimes when Hubbs and I pass the pizza store on Church Avenue as we do our grocery shopping, he thinks he needs pizza suddenly, but costing $3 a slice (meaning just sauce and cheese - Hubbs is not vegan, remember), it can add up.  And what quality of ingredients to they really use anyway?  I am always telling him that I would much rather make it myself with quality ingredients and have him eat something made with love.  So he got the brilliant idea the other day to make calzones.  I'm not sure if he's even ever had them before, but saw them in the pizza store, got really excited and wanted them. 

I have definitely mastered the pizza thing, but I've never made a calzone before.  So, I of course went online and followed some instructions off of someone's blog (of course I can't remember which blog now).  I really liked how they weighed out the dough to keep things consistent.  They suggested using 4 oz. pieces of dough.  I've made the dough a thousand times before but have never weighed it, so that seemed like a decent number to me.  Now, however, thinking back, that was a HUGE piece of raw dough, because it still had to proof, then bake, which would make it about 2 times the size. 

So, using a double batch of pizza dough, I ended up making 8 incredibly giant calzones, 3 of which I ended up freezing, because once we ate them for several days straight, we didn't want to see them for a long time to come!  So here is the process I went through making them for the first time.  I will definitely make them smaller next time and not fill them as full, because several of them lost their delicious cheesy filling.  We'll just have to wait till next time to see how much better they will be.  They were crazy delicious though, especially when dipped in warm homemade marinara sauce!  Yum!

Spicy Chorizo Calzones:

Yes, I am a GIANT calzone, but made Hubbs happy!

Pizza Dough:
1 cup warm water, not too hot
2 teaspoons instant yeast
1 teaspoon turbinado sugar
1 tablespoon olive oil
1 teaspoon sea salt
3 cups unbleached flour

Toppings:
vegan cheese, shredded
sauteed green peppers and onions
homemade marinara sauce
vegan sausages, cooked and sliced

1.  To prepare the dough: place the water, yeast and sugar in the bowl of a stand mixer and whisk to combine.  Allow the mixture to sit for 5 minutes until bubbly.  If it does not bubble up, the yeast may be dead, so start over.
2.  Into the bubbled up mixture, add the olive oil and sea salt.  Mix again.  While the stand mixer is working, add the flour in 1/2 cup increments until it is all incorporated.  Mix for a couple minutes, until when the dough is touched, it springs back. 
3.  Place a towel over the dough, place it in a warm place and allow it to double in size, about 45-60 minutes. 
4.  In the meantime, prepare the rest of the ingredients: saute the veggies, prepare the marinara sauce, shred the cheese, saute and slice the sausages.
5.  Punch the dough back down and separate the dough into 2 ounce pieces.  Generously flour the countertop, roll the piece of dough in the flour and roll out into a nice sized circle. 
6.  Place the cheese, veggies, sausages and marinara in the very center of the circle.  Do not overfill.  Carefully place the top of the dough over the center, and using a fork, press the dough together to create a good seal. 
7.  Finish the rest of the calzones as above.  Once the calzones are filled, place on a oiled baking sheet and again cover with a towel.  Allow to rise for about 30 minutes.
8.  Preheat the oven to 375 degrees.
9.  Once the calzones have risen again, place in the oven and bake for 15-20 minutes, or until the dough has cooked all the way through and the top is nice and golden.  Let cool for several minutes before serving.


The uncooked pizza dough with the "cheese" & sauteed veggies
& my flour bin in the background (didn't notice it there before)


Topping with the cooked vegan sausages


Homemade Marinara


Sealed the calzone


After the calzone baked, all the cheesy goodness
seeping out the side.


Fresh baked calzone sliced in half for the Hubbs
 
How freaking delicious does this look??


Enjoy!

Koko

Homemade Marinara Sauce

I know there are a lot of people out there that always but their own marinara or pasta sauce, either because they think they are too busy or because they think marinara is difficult to make.  I don't think there should be an excuse to buy marinara ever again, because this recipe is so simple and so quick.  The only vegetables you actually have to cut/chop are the onions and the garlic.  And it only needs half an hour to cook, most of which is inactive time.  This means that you are free to do something else while the sauce is cooking itself.  Keep in mind that this is a very basic, but incredibly tasty marinara sauce.  Most of the time I make this exact recipe, but I have been know to add things to it depending on my mood.  I have added chiffonaded fresh basil at the very end of cooking, Trader Joe's Soy Chorizo to make a spicy marinara, as well as a vodka sauce - add vodka and a cream substitute (unsweetened soy or almond milk works well), and a marinara with red wine.  There are so many options, but start off by making this one.  And if you like your sauce smooth, simply use an immersion/hand blender and blend it right in the pot, or allow it to cool slightly and blend it in the blender.  So easy.  Another great idea is to at least double or triple the recipe.  Use what you need and freeze the rest in pint and quart containers.  The next time you need marinara in a hurry, you won't have to reach for that bottled sauce - simply place the frozen marinara in a small pot over medium heat, and you will have a hot homemade sauce in ten minutes. 

Marinara:

Large Bowl of Homemade Marinara!  Yummy!

Yields: 1-1 1/2 quarts

2 tablespoons olive oil
1 large onion, small diced, about 1 1/2 cups
8 garlic cloves, minced
4 cups of cooked tomatoes, crushed with your hands
2 tablespoons tomato paste, optional - makes sauce thicker
1 teaspoon sea salt
1/4 teaspoon black pepper
1 1/2 teaspoons dried basil
1 1/2 teaspoons dried oregano
1 teaspoon dried thyme, crushed with fingers

1.  Place a large pot over medium heat, add the olive oil and allow it to become hot.  Once the oil is hot, add the onion and garlic and cook, stirring periodically, for about 10 minutes, or until golden and fragrant.  Now add the spices: sea salt, black pepper, dried basil, oregano and thyme.  Stir to combine.  You could add the spices to the sauteed onions and garlic, or you could wait until after adding the tomatoes - whichever you prefer.  I prefer to add them to the sauteed veggies because I feel that it helps to evenly distribute the spices. 
2.  Now add both the crushed tomatoes and tomato paste, stirring until all the ingredients are well combined. 
3.  Allow the marinara to come to a simmer.  Once the mixture begins to simmer, turn the heat down to medium-low.  Allow the marinara to gently simmer for about half an hour, stirring periodically.  At the end of the half hour of simmering, taste the marinara and adjust spices or salt level. 
4.  The marinara is now ready to use.


Close Up of the Deliciousness!


Enjoy!

-Koko

Wednesday, September 12, 2012

Vegan Takeout in Brooklyn: "Shrimp" Pad Thai & Sesame "Chicken"

Hubbs and I try not to eat out a lot.  Here in NY eating out can happen a lot and is so convenient that you're eating out before you even think about it.  Unfortunately, with our busy schedules, sometimes it's unavoidable.  Thankfully we have this place in the neighborhood that delivers right to our apartment.  It's called Zen Vegetarian House.  It's an Asian Fusion restaurant that has pretty tasty food, you just have to watch out for the overly fried stuff.  Hubbs being from a tropical place right on the water loves everything to do with fish.  Even vegetarian fish (I know it doesn't seem to make sense, but it tastes very realistic).  So he ordered the Shrimp Pad Thai and I ordered the Sesame Chicken.  I'ev used the vegan shrimp before in recipes I've made at home, so I know how tasty it is, and that was my suggestion for the Hubby to order.  He loved it!

I used to absolutely love the sesame chicken offered at Chinese restaurants back in Michigan when I wasn't vegetarian.  I've tried to make the sauce several times and serve it over seitan, but it isn't exactly the same thing.  However, when I ordered it for the first time at Zen, I was amazed that it tasted exactly like what I remembered it tasting all those years ago.  So, that's another challenge I think I should take on coming up - figuring out how to make sesame sauce so I can make my own vegan sesame chicken using the soy chicken I buy at May Wah in Chinatown.  The best place ever - check it out!


"Shrimp" Pad Thai


Sesame "Chicken" with Broccoli

Enjoy!

-Koko

Tuesday, September 11, 2012

8/31/2012: The Art of Baking & Decorating Vegan, Gluten Free, Soy Free Cakes Class

I have been very busy lately with teaching my vegan, gluten free, soy free baking classes at the Natural Gourmet Institute in Manhattan these last few weeks.  I have had one class per week for the last three weeks, which doesn't seem like a lot, but that amounts to lots of organizing and planning and 16-18 hour days.  But I love teaching.  It has become such a great passion and excitement in my life and I only wish I could do it more.  I also love that I am always meeting new and interesting people from so many different walks of life.  I really enjoy this little part of the class I do in the beginning, where I ask all of the students to give a little introduction about themselves and why they are taking the class. I am always surprised by the wide range of answers.  Sometimes it is because of food allergies or sensitivities.  Other times because people want to learn to bake vegan or gluten free, or both.  Sometimes there is also a person in their lives that is following a certain diet that they need to accommodate; they have a business where customers are requesting gluten free and they want to learn to incorporate dishes into their business, etc.  I love to hear their stories!

As I have said in the past, with my schedule being pretty crazy with work, menu writing, recipe testing and business plan writing, it does not leave a lot of time for blogging.  However, I am still taking the same volume of pictures, maybe more as my husband claims (insert roll of eyes) and I have at least 200 blog posts half finished with the recipes written down and/or the pictures hanging around.  So I really want to get these recipes or pics out there for you guys to check out, so perhaps for a while I am going to be posting some with pictures, some with recipes, and some with a short blurb.  I'll see how that works and go from there. 

Until then, take a look at some of the cakes my students decorated in the gluten free cake and cake decorating class I taught on August 31st.  Until recently, I had been taking my own pictures of the cakes or pastries the students make, but I feel like that takes time away from the students, so lately I have been having one of the amazing assistants take the pictures throughout the class, and that has been a tremendous help.  I am so thankful for those ladies!  Couldn't do my classes without them, that is for sure!!

Cakes Decorated by my Students:

Pineapple Coconut Cake with Toasted Coconut Frosting


Demo Cake - I know it isn't pretty, but it shows the different
techniques we were practicing.


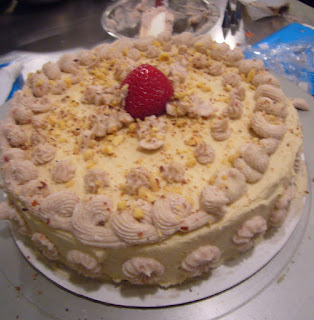
Strawberry Swirl Cake with Strawberry Creme Frosting,
Garnished with Hazelnuts


Strawberry Swirl Cake with Strawberry Creme Frosting


Hazelnut Cake with Maple Frosting & Chocolate
Frosting Decorations


Hazelnut Cake with Maple Caramel Frosting


Spiced Banana Cake with Creamy Chocolate Frosting


Enjoy!

-Koko

Tuesday, August 21, 2012

Gluten Free Vegan Masterpieces Class in Manhattan

I taught a class last night at the Natural Gourmet Institute in Manhattan.  As usual when I teach the classes at the school, it was a vegan, gluten-free, soy free baking class that also had several ingredient restrictions - such as no refined sugars, oils or flours, as well as utilizing mostly organic ingredients.  This is definitely great, but forces me to be very creative and imaginative with the recipes and ways to present the dishes.  In the class, we made 7 different recipes and I brought along a gf bread I have been working on testing.  I received great reviews on the bread, which I am very happy about, but I think it still needs a little tweaking to get it exactly where I want it to be, but it is definitely in the right direction.  I can't wait to be making it into multigrain bread, "rye" bread for my tempeh reuben (it is so ridiculously good, especially when I add tomato and avocado.  YUM!) and all kinds of flavors in between.

I'm not going to share any recipes at this point, perhaps at a later date, however, I will share some of the pictures I took, and am hoping one of my assistants in the class that took a ton of pictures will share hers with me and I can post them later.  It was a blast and I enjoyed meeting and working with everyone in the class.  Till next month, and the next baking class I teach at the school!


Coconut Raspberry Roll Cake


An aerial view of the Roll Cake


Chocolate Chip Cherry Cookies - a little blurry


Peach Coffeecake with Pecan Sucanat Struesel Topping


Chocolate Cupcakes with Coffee Frosting
Iced by almost everyone in the class!


Gluten Free Yeasted Bread test!


Pistachio Thumbprints


Lemon Blueberry Loaf


A "Sample" plate.  Looks like a plate of dessert for dinner!

Enjoy!

Koko

Sunday, August 12, 2012

Homemade Lemonade

This is something the Hubbs and I have been having a lot of this summer.  Actually we can't seem to get enough of it.  It is so refreshing and not overly sweet - it's great in this hot hot heat!  I've done a lot of different things to it like adding other concentrated juices such as tart cherry, cranberry and blueberry.  I've also put the lemonade in the blender with some fresh berries, mostly strawberries and raspberries, blended till smooth and had an awesome frothy, fruity lemonade.  The possiblities are endless.  Hubbs suggested mango to try next - sounds good! 

Homemade Lemonade:


Fresh Lemonade garnished with lemon slices.

Lemonade:
1/4 cup turbinado/raw sugar
juice of 1 1/2 lemons, rolled on the counter to soften
2 cups filtered water

My mom always sends me amazing homemade canned goods from Michigan and I have also done my share of canning here in NY, so I have a ton of glass jars, which is what Hubbs and I store most of our food and all of our drinks in. 

1.  Juice the lemons and place in a jar.  Add the sugar and filtered water, cover with the lid and shake until the sugar dissolves - this will take some time because the sugar is large granulated. 

That's it!  So easy and tasty!

Enjoy!

Koko

Friday, August 10, 2012

Best Dinner Ever! Appetizers!

My Hubby and I went on an amazing vacation to Michigan to visit my family and came back to NY 1 1/2 weeks ago.  It's sad though, because it almost feels like it was a dream and that I never left ny at all.  I did actually get a little color and a disturbing flip flop tan, but that has unfortunately already disappeared.  As soon as Hubbs and I landed in MI and were greeted by my mom, dad and younger brother Danny, we knew immediately that ny was no longer the place we were meant to be.  We've been feeling for a while that we are tired of ny and ready to be around family, and it only cemented it in our minds that we need to be there.  My older sister has a 2 1/2 month old baby boy and my older brother and his wife are expecting their first baby (a girl!) on Thanksgiving.  I have never seen my sister pregnant (and this was her 3rd and final child!) and was blessed to see my sister-in-law with the bump (she's almost 6 months along).  The unfortunate thing is that I will not see my brother and his little one until she is 9-10 months old or so. Sad.  So those were a couple of the motivating factors, but certainly not all.  I miss my family.  My oldest brother's daughter is going to be 13 in November - I can literally remember the day she was born and we have always been very close. 

We are also getting close to starting our business - a vegan cafe, and have decided to open it in Traverse City, Michigan.  We have finished our menu, have tested and perfected it all, and are now working on the baked goods.  It is the most exciting and stressful thing ever, but we cannot wait to get started.  Lots of work on the business plan and lots and lots of cooking in this oppressive humidity and heat!  I have decided not to renew my teaching contract at the Natural Gourmet Institute in Manhattan when it finishes in March, and as soon as our lease is up at the end of July next year, we will be moving to Michigan!  I am so excited and cannot wait!

Until then, however, I'm gonna keep working on all the business aspects, keep cooking and baking and see my friends as much as possible.  And in this terrible heat, I do not want to be in the kitchen unless I'm testing recipes.  So dinners have been simple: a lot of sandwiches and salads lately.  This time, however, I wanted to have an appetizer dinner and just eat a little bit of this and that and it was a blast, Hubbs definitely thought it was fun, and I'm glad the only time I spent in the kitchen was slicing the cheese for him, slicing the bread and putting everything in ramekins.  Best dinner!

Appetizer Dinner:


So simple and tasty!
What I Used:

Baguette, sliced on the diagonal
Homemade dill pickles (sent to me from Michigan, made by my mum)
Assorted Olives
Earth Balance, Yellow Mustard
Sliced Cheese (dairy) for the Hubby
Sliced Daiya for me
Artichoke Salad (which for some reason was not in the picture)

Use whatever you'd like and have a super easy dinner!

Enjoy!

Koko

Wednesday, July 11, 2012

Burgers, "Doritos" & Pasta Salad - Summer in Brooklyn!

The weather here in Brooklyn (and all over the US I'm sure) has been hideously hideously hot lately.  Unbearably so in fact.  What Hubbs and I initially thought of as a great grilling summer has turned into a stay inside or sweat to death outside and die of dehydration kind of summer thus far.  We grilled for the first and only time about a month ago in Prospect Park when it wasn't exactly warm, but rather cool and refreshing out and had a great time.  We had veggie burgers, homemade pasta salad and those strange natural doritos-like chips they have in health food stores.  It was a simple outing with simple fare, but was a great time.  We vowed to do it again and again.  But it has been in the triple digets so much or the lowest being the low 90's, that it has not been worth it or even desirable.  I'm hoping the weather will cool slightly (mid 80's are great!) and we can bust out our tiny NY grill.  It actually looks relatively decent sized in the pictures, but if my family or friends back in MI saw the size, they would laugh hysterically!

Anyway, we had a great time and definitely want to go again soon!


Hubby lighting the charcoal, wearing the gloves
his wifey insisted upon bringing! ;)


The tasty fare: Veggie Burger, "Doritos", Pasta Salad


All the goodies piled on the burger.  Yum!

Enjoy!

Koko