Showing posts with label Quick Cooking. Show all posts

Sunday, May 4, 2014

Country Fried Seitan Sandwich with Coconut Cheddar Cheese & Organic Baked Fries

I started a new job about two weeks ago.  It is a very interesting and fun job!  I am working at a food truck downtown and having a great time with it.  It is something I have really missed about NY - working for a place that doesn't have a ton of structure and allows me to do what I need to do, but without a ton of supervision and demands.  It's a pretty cool gig.  I am still working part time as a vegan pastry chef, which is good, but doesn't include a lot of hours.  This past week I definitely made my hours, which was great.  

The place is called Ez Cheesy, which is basically a gourmet grilled cheese sandwich truck.  Pretty cool and different menu.  Obviously it is not all vegan, but all but one of the sandwiches are vegetarian and the rest can be made vegan with the inclusion of daiya.  I love that!  This is part of the menu this year:


Tampopo: Ramen Noodles mixed with Kimchee, topped with Brussel Sprouts and Cheddar/Daiya

Old Mission Torta: Smashed Beans, Avocado, Queso/Daiya, Pickled Jalapeno Peppers, Shaved Radish, Spicy Mayo

City Middle: Local Made Donut with Goat Cheese and Fig Jam (would be great with vegan cream cheese)

Sweet Caroline: Shaved Carrot, Goat Cheese, Walnuts & Honey


There are more items on the menu, but I thought I would put a couple so you could see how different and cool this place is!

Making sandwiches all week, you would think I would get tired of them, but it actually inspired me to work more on the menu for our upcoming cafe and make a couple different sandwiches at home.  I made this tasty one as well as a couple veggie paninis.  Yum!  I found a really interesting recipe for vegan cheddar cheese, using coconut milk as the base.  It's very meltable and cheesy in texture, but I really didn't care for the flavor.  I definitely think it is something that warrants more testing and playing around with.  How cool would it be if it were actually that easy to make a meltable vegan cheese?!


This was Hubby's plate.  So Good!

To make the Sandwich:

- Country Fried Seitan

 - Fresh Baguette, sliced into portions and cut in half, toasted

 - Veganaise or other topping

 - Sliced Veggies: tomato, green pepper, red onion

 - Coconut Milk Cheddar Cheese or other vegan cheese

 - Baked Fries or side of choice


1.  Toast baguette.  Slather veganaise on both sides of the bread.  Place veggies on the bottom, followed by the seitan.  Layer the cheese in there somewhere.  (I should have put it next to the seitan so it could have melted slightly.)
2.  Add fries or other side and eat!


You can barely see the vegan cheddar peeking out from underneath the veggies!


Enjoy!

Koko

Thursday, April 10, 2014

A Passing in the Family & a Simple Vegan Meatball Sub

Today my Grandma on my father's side passed away rather suddenly.  She had been living in a nursing home for probably the last 3-4 years and my mother was taking care of her for two years before that.  She has not been in good health for many years, but did not seem to be doing too badly.  Very much a shock.  I'm very sorry to say that we were not close.  None of my siblings and I were too close with her.  I saw her about four years ago, then probably not for ten years before that.  I feel terribly for my dad and feel sad for the relationship we never were able to have with her.  My dad was able to take off three days from work for bereavement to take care of all the details - he is the oldest sibling and in charge of the details. 
 
I felt an overall sadness today, not really inspired to do too much.  I had a lot of things I should have been doing, but really never got around to them.  I spent most of the time with my dad and other siblings that stopped by to support him.  When he left to look into my Grandmother's affairs, I realized it was midway through the day and that I should eat something.  I decided on the quickest thing I could think of: a sub.  I had just bought some nice, fresh bread with the hubbs and had a package of Gimme Lean Ground Beef in the freezer for a couple months that I bought on discount at the local food coop.  I also had some homemade marinara sauce hanging out in the freezer so I knew a meatball sub would come together nicely.  Super easy and satisfying. 


Easy and delicious - before being toasted


1/2 package Gimme Lean Ground Beef, rolled into balls
olive oil

Fresh Rolls/Baguette
Marinara sauce
Vegan Sliced Cheese
Vegan Cashew Parmesan Cheese

Toppings:
Sliced Green Peppers
Sliced Onions
Fresh or Pickled Jalapeno Peppers
Sliced Dill Pickles
Kalamata or Black Olives

1.  Preheat the oven to 375 degrees.
2.  Cook the meatballs in a small amount of olive oil until crispy and heated through.
3.  Slice the roll/baguette in half, spoon some marinara sauce on top, followed by the meatballs, the vegan cheese(s) and the toppings.
4.  Place the loaded sub on a baking tray and bake for about 10 minutes, or until the bread is toasty and the cheese is nice and melty.
5.  Cut in half and serve with additional marinara sauce on the side for dipping.


Koko

Sunday, January 19, 2014

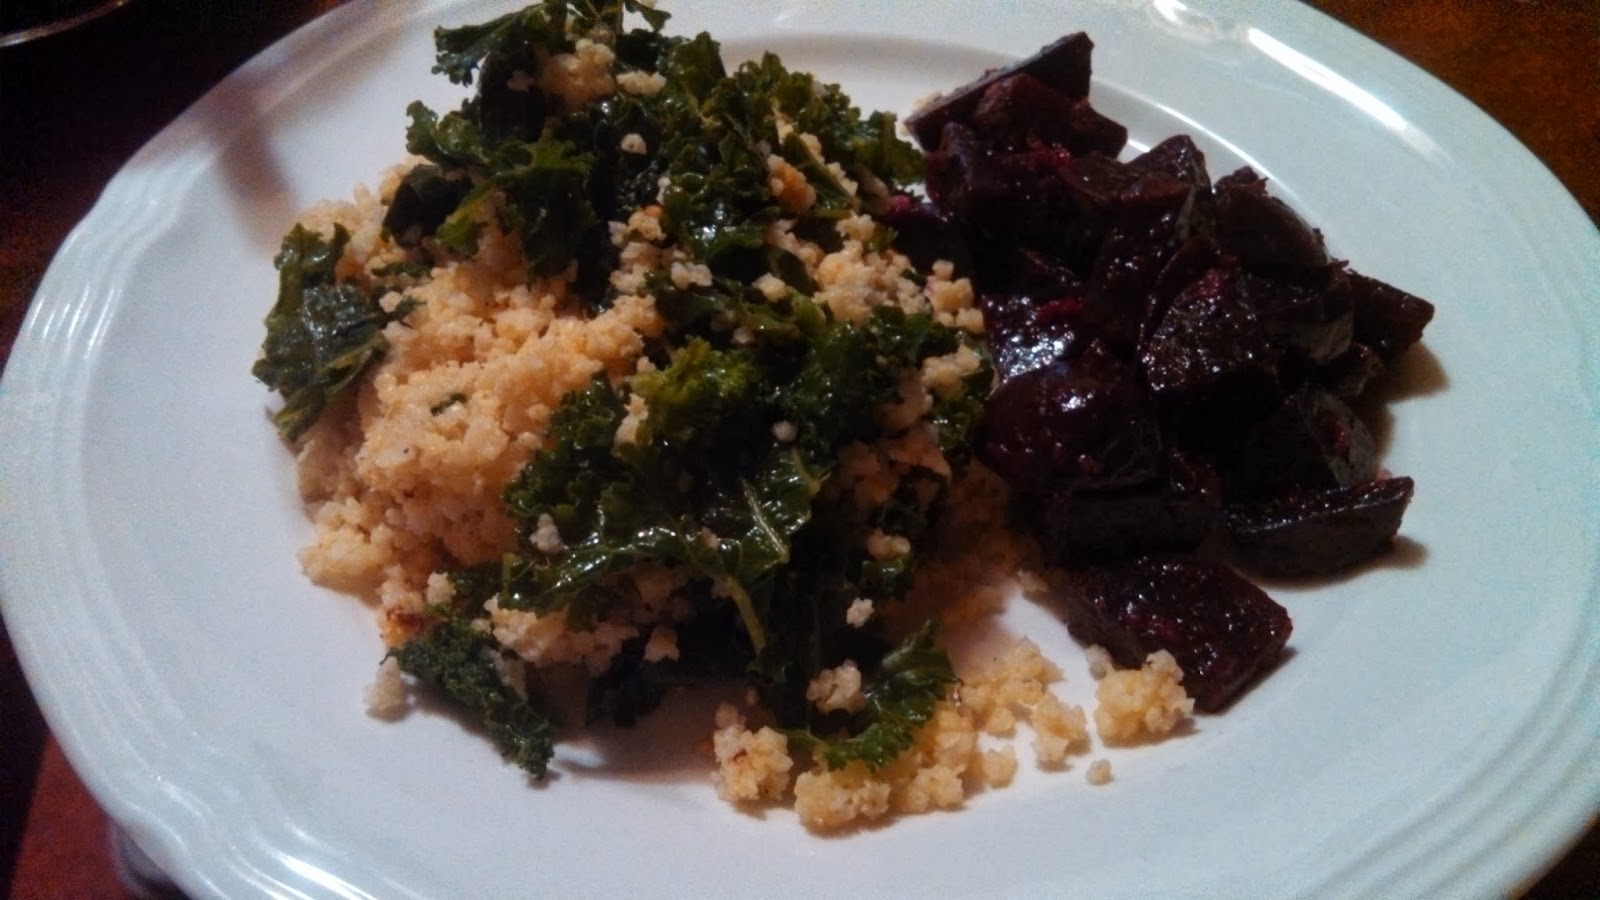
Millet with Kale, Mushroom Gravy and Beet Salad

I love the website Oh She Glows.  I follow it quite religiously and am always so impressed how Angela Liddon makes all of the food just look so amazing and healthy.  Pretty much every picture I see, I say to myself "I am so going to make this!"  The reality, of course is that I have so many recipes that I just have to make, and trying as of this point to keep to a budget, but still eat healthfully, is challenging, and I can't make every dish if I don't have the ingredients at home.  I think most of the ingredients in this dish people with a well stocked fridge and pantry should pretty much have on hand at all times.  This is one that seemed pretty easy to make, healthy, but also very much a "comfort food" item.  Sometimes the hubby can be finicky about creamy sauces and gravies, but I thought this would be great.  He ended up loving it, but didn't want to take it to lunch the next day, because in his words it was too light for a hardworking, strong man like him.  Insert good-humerdly crossing of the eyes here.  It ended up being a bonus for me because I ended up taking it for my lunch and was very satisfied!  Try making it and go over and take a look at what Angela ended up doing for the same dish over at Oh She Glows.  I didn't follow her recipe exactly, but used it as a guideline to make my own dish.


Super Comfort-Foody and Delicious!


Gravy:

Yields: 2 1/2 cups

2 tablespoons canola oil
2 cloves garlic, minced
1 onion, small diced
4 oz. criminis, small diced
4 tablespoons unbleached flour
2 cups filtered water
1/2 teaspoons sea salt
1/8 teaspoon black pepper
1/4 teaspoon dried thyme, crushed with the fingers
2 tablespoons nutritional yeast
1 tablespoon tamari
1/4 teaspoon unchicken boullion

Garlic Kale:
12 cups kale, blanched
1 1/2 tablespoons olive oil
4 cloves garlic, minced
sea salt and black pepper

Millet:
1 1/2 cups millet, rinsed
1 teaspoon olive oil
3 cups filtered water
1/2 teaspoon sea salt

1.  Cook the millet in the oil until toasted and most of the water has evaporated.  Add the filtered water and sea salt.  Bring the millet to a boil, reduce heat to a simmer, cover, and cook till the water has absorbed and the millet is fluffy,
2.  Prepare the gravy:Add the oil over medium heat.  Once it is hot, add the onion, criminis and garlic, stirring frequently until they begin to color.  Add the unbleached flour and stir well to coat. 
3.  Allow the flour to cook for a couple minutes so that the raw flour taste goes away.  Add the water all at once, whisking immediately so the gravy does not clump.
4.  Add the remaining in gredients to the gravy: the sea salt, black pepper, thyme, nutritional yeast, tamari and unchicken boullion.  Whisk well to combine all the ingredients.  Continue cooking till the gravy has thickened to your liking.  Season to taste.
5.  Prepare the garlic kale:  blanch the kale just until it turns a bright green color - about 30 seconds.  Drain.
6.  In a small pan over medium heat, cook the garlic in the olive oil until it becomes golden and cooked through.  Season to taste with sea salt and black pepper.
7.  To serve, place a mound of the millet on the plate, followed by a generous serving of kale, then top it all off with gravy.  Healthy comfort food at its best!


The millet mixed with the garlic kale.


The plate before adding the gravy.  Yum!


Enjoy!

Koko

Monday, January 13, 2014

Pasta Veggie Saute with Cherry Tomatoes

I am always on the hunt for a deal.  Even when I am shopping and not necessarily intending to purchase something.  Our local coop here in Michigan - Oryana - is great!  They have this really cool thing where when a product is close-dated or maybe a little bruised, they slap a half-off sticker on it and you get something healthy and organic (most of the time!) for a great deal.  Recently I have scored several fake meat items that I just stick in the freezer for a time when I don't really feel like cooking. 
 
The last time I was there, there was a bunch of stuff from the produce department that had half off stickers on them (all being organic): cauliflower, mixed greens, a couple packages of beautiful cherry tomatoes, a bag of apples and a bag of carrots that was ripped open.  Great score!  So I had a couple packages of cherry tomatoes sitting in the fridge for a couple days and decided to make a simple pasta dish  that came together quickly.  It also came out looking beautiful.  Hubby had two giant plates of it, which he of course immediatley sprinkled with cheese.  I ended up roasting the cauliflower with winter squash, juicing the apples and some of the carrots (then making muffins from the pulp), making a giant mixed green tossed salad with the greens and a pasta salad with the rest of the cherry tomatoes.  So good!


The pasta and veggies after cooking.


Pasta Veggie Saute:
8 oz. spiral pasta
8 oz. cherry tomatoes, halved
1 green bell pepper, julienned
1/2 red bell pepper, julienned
1/2 red onion, julienned
6 pieces tempeh bacon, cooked and chopped
1 1/2 teaspoons vegetarian mock chicken boullion powder
1/4 teaspoon chipotle pepper powder
1/8 teaspoon black pepper


Some nice veggie cheese to melt on top.  Yum!


Enjoy!

Koko

Wednesday, January 1, 2014

Vegan Chicken & Broccoli


 Happy New Year!


Hubby & I last night in a beautiful condo my mom
surprised us with for the night.  Fun!


I hope everyone had a great New Year's and is as excited as I am about this coming new year.  2013 was a very bittersweet year for me - one of the most difficult I have been through in recent years, but I know it has and will continue to make me grow into a better person.  I came to some interesting realizations about myself and have just really been forced to become stronger.  I have so many goals for this coming year, but unlike many New Year's past, I have not written them down or described them as "New Year's Resolutions".  So perhaps here is a good opportunity to write them down so I can remember them later, although I will not be going as crazy about them this year as I usually do.
 
  • Focus on bettering my Spanish - hopefully I will be able to have more of a complete conversation with my mother-in-law by the end of the year

  • Eat more cleanly - less snacking - that's my problem.  And use up a lot of the pantry items I brought back from Brooklyn with us- make more food items out of what we have - not going out and buying new things every time I decide to cook something

  • Be more open to trying new things that usually make me uncomfortable: singing in front of others, dancing, saying "ok, sure, let's do it", rather than "uh ..."

  • Focus on being healthy - yes exercise more, but not letting "weight loss" be the main focus

  • Work on our business

What are some things you guys are wanting to do differently this year?  They don't have to be resolutions per se, just some things you want to focus more on. 


Going along with my concept of eating well and using the ingredients I have on hand (not too many fresh ingredients left - definitely have to go shopping!) I decided on this vegan chicken and broccoli that I served with brown rice.  So delicious and simple enough to make on this day of feeling tired after not getting much sleep last night.


Serves 4
 
Steamed Brown Rice, to serve
 
Vegan Chicken and Broccoli:
1 8 oz. pkg. vegan chicken, thawed
1 1/2 tablespoons untoasted sesame oil
2 tablespoons minced garlic, about 2 large cloves
1/2 teaspoon red pepper flakes
4 cups broccoli florets (I used the stems too, just peeled them first)
6 tablespoons unchicken broth, separated
1 tablespoon sesame oil
sea salt and black pepper to taste
5 scallions, sliced on the diagonal
1/4 cup organic hoisin sauce
3 tablespoons mushroom oyster sauce
Sesame seeds, for garnish
 
 
1.  Place a wok over medium-high heat and add the 1 ½ tablespoons of sesame oil.  Once the oil is hot, add the garlic and dried red pepper flakes.  Stir fry for 30 seconds, or until fragrant.  Add the broccoli florets (and stems if you would like) and 4 tablespoons of the unchicken broth. Stir fry broccoli for 2 minutes, or until desired doneness is achieved.  Remove from the pan and set aside.
2.  Add a little more sesame oil to the wok (about 1 tablespoon).  Add the thawed out chicken to the wok and cook just until heated through, and slightly browned if desired (keep in mind that this chicken is fully cooked and could even be eaten as is, although I wouldn't recommend that!).
3.  Add in remaining 2 tablespoons of unchicken broth, oyster mushrooms sauce, and hoisin sauce.  Add the cooked broccoli back into the pan and move around just until the mixture is heated through.
4.  Serve over top of the steamed brown rice.  Sprinkle with sesame seeds if desired.


Enojy!

Koko

Sunday, December 1, 2013

Savory Vegan French Toast

 My Hubby and I differ quite a bit on what we like for breakfast, especially since we moved away from New York and due to the fact that he is not vegan (read - he loves eggs).  When we were in NY and had access to fresh plantains, yucca and other amazing Spanish foods, we would eat those most days.  Those things are not so easy to find here in Northern Michigan, and when we do find them, they are very costly and not super fresh.  Most of the time, Hubbs and I will choose a savory breakfast over a sweet one, even eating sandwiches sometimes.  But sometimes I just want some American-style breakfast - like pancakes, waffles, (tempeh) bacon, etc.  But when I make those suggestions, he groans. 

Then one day when I was looking through the freezer to see what we had, I noticed we had a ton of bread (Hubbs gets bread for free from his job when the expiration date is close and we just pop it in the freezer).  I hadn't had French toast in a long time - basically since I was a kid living back home.  I made the suggestion to Hubbs, and he was kind of grossed out, but intrigued.  He had one request though: don't make it sweet.  Not sweet?  I thought about it for a while and decided it was a great idea.  I came up with a batter to dip it in and it turned out pretty good.  After making a couple adjustments, it came out great and this is one of our go-to breakfasts - something we can both agree on.


Nicely Spicy with Cool, Tangy Sour Cream


Serves: 5-6 slices, about 2

Multigrain Bread - 5-6 slices
Olive oil/canola oil

French Toast Batter:
1/2 cup chickpea flour
3 tablespoons unbleached flour
1/8 teaspoon baking soda
1/8 teaspoon sea salt
2 pinches black pepper
2 pinches cayenne pepper
2 pinches chipotle pepper powder
pinch of each onion and garlic powder
1/2 cup water

Toppings:
vegan sour cream
sriracha
salsa

1.  In a medium bowl, whisk together the chickpea flour, unbleached flour, baking soda, sea salt, black pepper, cayenne pepper, chipotle powder, onion and garlic powder.  Whisk together until combined.
2.  Add the water and whisk together to form a batter.
3.  Place a medium saute pan over medium heat and add a tablespoon or so of the olive oil or canola oil.  Allow the pan to become hot.
4.  In the meantime, make an assembly line of the bread, batter and a clean plate.  Dip each piece of bread in the batter, being sure to evenly coat both sides.  Place up to two slices of the dipped bread onto the clean plate. 
5.  Once the pan is hot, place both of the dipped slices of bread carefully into the oiled pan.  Allow each side of the bread to cook for a couple minutes per side, or until golden and crispy.  While the French Toast is cooking, continue dipping both sides of the bread until all of the batter and bread is used up. 
6.  Once all of the dipped bread has cooked through, place two slices on a plate, cut each piece in half and top with the sour cream and hot sauce or salsa.  That's it - simple and crazy delicious!


Enjoy!

-Koko

Friday, November 29, 2013

Steamed Romanesco


I am Gorgeous!

Last Sunday my Husband and I attended a vegan potluck with the TC Vegans.  I believe we have gone to three of the potlucks so far since we have moved to Michigan, and this one was definitely the best so far.  So much tasty vegan food!  I made a couple tasty things too.  An Israeli cous cous salad (recipe coming soon) and Peanut Butter Cream Pie.  We also had some vegan gf lasagna, sweet potatoes, homemade baked beans, a sort of enchilada casserole and I'm sure a couple other things I am forgetting.  One of the lovely ladies there made a tasty stir-fry using romanesco and was talking about how much she liked the vegetable.  I told her I wasn't a fan of the vegetable and she gave me a piece of it raw, before she added it to her stir fry.  I was pretty sceptical, but tried it, and was pleasantly surprised by the flavor - a cross between broccoli and cauliflower.  Perhaps the one I tried all those years ago wasn't super fresh?  I was fortunate to have the Hubby bring one home from work and decided to try it again.  But since Thanksgiving was so close, I didn't want to make something super involved.  So I simply steamed it and tossed it with olive oil and sea salt.  It was very simple and tasty!   Hubby thought it was a little plain, so he added some tamari and red pepper flakes.  Simple and tasty - I'll definitely have to make something out of it again, once I feel more like cooking after the Thanksgiving food coma goes away!


Simply Steamed

Steamed Romanesco:

1 head romanesco, separated into florets
Extra Virgin Olive Oil
Sea Salt
Seasoned Salt, Red Pepper Flakes, Tamari, Chipotle Pepper as desired

1.  Steam the romanesco in a steamer basket over boiling water till just tender.  Remove from steamer basket, drizzle with a small amount of olive oil and sprinkle with sea salt (or other desired toppings). 

 
Koko


Tuesday, November 12, 2013

Pasta With a Creamy Sauce, Steamed Broccoli

Do you ever crave super super simple things to eat?  Sometimes I find myself going through these phases where I only want some pasta with a creamy white sauce and either a steamed veggie or seasoned veggie on top.  This is one of those times.  I was very hungry, didn't feel like making something complicated or time consuming in the least and wanted really simple flavors.  So this tasty pasta came to mind.  I have my Mum to thank for this, because the base of the sauce came from her.  She taught me how to make a basic white sauce so long ago, and it comes in handy so often!  It is a kind of base for a vegan bechamel sauce, for a white sauce for a pizza or lasagna, pasta, or really anything at all.  So this is for you when you're feeling like eating simple tasty food, and are not in the mood to make something complicated or time consuming.  But still tasty!

 
Pasta with a Creamy Sauce, Steamed Broccoli:


Creamy Sauce with Yummy Steamed Broccoli


8 oz. desired pasta shape, cooked

1 head broccoli, separated into florets
extra virgin olive oil to coat
sea salt to taste

White Sauce:
4 tablespoons earth balance
2 tablespoons unbleached flour
2 cups unsweetened soymilk
3 tablespoons vegan cashew parm, or as desired
1 teaspoon sea salt
1/4 teaspoon black pepper


1.  Bring a large pot of salted, oiled water to a boil.  Drop in the pasta and cook until al dente.  Scoop the pasta out with a large slotted spoon.  You'll want to keep the boiling water to blanch your broccoli in.
2.  While the pasta is cooking, prepare the sauce.  In a medium pot, add the earth balance over medium heat.  Once the earth balance has melted, add the unbleached flour, whisking together immediately, and continuing to cook until golden in color.
3.  Once the flour has cooked slightly, add the unsweetened soymilk, vegan cashew parm, sea salt and black pepper.  Whisk immediately or the flour will seize, creating a lumpy sauce.  Continue cooking over medium heat until the sauce has thickened and flour has cooked all the way.  Season to taste, adding more parm, salt or pepper as desired.
4.  While the sauce is cooking, submerse the broccoli in the boiling pasta water and cook for about one minute, or until softened but still crisp.  Drain, discarding the water.
5.  Toss the steamed broccoli with extra virgin olive oil and sea salt.
6.  To serve, toss the cooked pasta in the sauce, coating evenly.  Place a serving in a bowl and top with the blanched broccoli.  Top with fresh cracked black pepper or additional vegan cashew parm. 
 
 
Enjoy!

Koko

Monday, September 9, 2013

Creamy Pasta Salad with Veggies from the Garden

We have been having a ridiculous amount of veggies coming out of the garden lately.  And because my mom spent so much time putting the garden together (all because of Hubbs and I - she hasn't had a garden since I've been away from home), it makes sense that I am the person picking the produce from the garden and trying to come up with creative ways to use up all of the ingredients.  The idea of throwing anything away because I have not been able to come up with something to use it for or didn't get to it in time is kind of nauseating.  So with the cherry tomatoes and bell peppers from the garden, as well as kalamata olives, carrots and local celery and scallions that I picked up from my local coop, I made this tasty pasta salad.  My mom is a huge fan of pasta salad, albeit the one with just celery and mayo, and surprisingly thoroughly enjoyed this one.  She loves tomatoes - she will eat the roma tomatoes from the garden like apples, so she loved the cherry tomato addition.  She was surprised at the flavor of the olives - I think she's only ever had those gross canned black olives.  And she is already a fan of edamame (thanks Aunt Nancy!), although she had no idea what they were called.  So try this pasta salad, or use it as a base and add in your own favorites/preferences.  It is delicious and I have actually already made it again, this time with lots of fresh cracked black pepper.  Crazy good!


Creamy Pasta Salad with Veggies from the Garden:


Creamy, delicious pasta with fresh veggies.  Yum!


Creamy Pasta Salad:

Serves: about 6

1-16 oz. package pasta (I used elbows)
2/3 -1 cup vegan mayo
1 cup cherry tomatoes, halved
1 green bell pepper, diced
1/3 cup sliced kalamata olives
2/3 cup shelled edamame, blanched
2 celery stalks, chopped
1 large carrot, peeled and shredded
sea salt and black pepper to taste

1.  Cook the pasta in salted, oiled boiling water until just tender.  Drain and rinse under cold running water.
2.  In a small pot with boiling water, cook the edamame until just tender.  (Be sure to check your package to see if the edamame is already cooked or needs to be simmered first.)  Drain the edamame and run under cold water.
3.  Toss the pasta, edamame and remaining ingredients in a large mixing bowl and mix until completely combined.  Season to taste with sea salt and black pepper.


Tomatoes and green bell pepper from the garden.


Enjoy!

Koko


Friday, November 30, 2012

Sauteed Snap and Snow Peas with Cashews

This is a really tasty, easy stir-fry (which I never make enough of!) recipe I found in Vegetarian Times.  I have been getting that magazine for so many years and even though I find myself oohing and aahing over so many of the pictures and recipes, I find that I rarely actually make any of the recipes, which drives my husband crazy.  After all, my hundreds of cookbooks are taking up so darn much space, I should be doing something with them, right??  Anyway, so I had several of these ingredients on hand already and it was a snap to come together.  Simple and tasty over some steamed rice.  Since my Hubbs isn't the biggest fan of brown rice, we did white rice.  I loved the idea of the cashews in the stir-fry, because I always see recipes and items on menus with cashews in them, but never think to order them or make them, not sure why, but I just never do.  Try this simple, quick, veggie-full dinner and have lots of time to do other things - like baking, what I'm doing now!  Yum!

Sauteed Snap and Snow Peas with Cashews:


So pretty, right?


Serves 4

1 tablespoon tamari
1 tablespoon toasted sesame oil
2 teaspoons arrowroot
1/4 teaspoon sriracha
2 pinches black pepper
1/4 teaspoon sea salt

1 tablespoon olive oil
1 medium red onion, julienned, about 1 cup
1 yellow bell pepper, julienned, about 1 cup
1 cup raw cashews
1 tablespoon fresh grated ginger
8 oz. sugar snap peas
8 oz. snow pea pods
8 green onions, cut into 1" pieces

Steamed white or brown rice to serve

1.  Whisk together the tamari, toasted sesame oil, arrowroot, sriracha, black pepper, sea salt and 1/2 cup filtered water into a small bowl.  Set aside.
2.  Heat the olive oil in a wok over high heat and add the onion, pepper, cashews and ginger.  Stir-fry for about 3 minutes, or until the onion and cashews begin to brown.
3.  Add the snap peas and stir-fry for one minute. 
4.  Add the snow peas and green onions.  Stir fry for 2-3 minutes.
5.  Add the sauce mixture and cook 1-2 minutes, stirring continuously, until the sauce has thickened and the vegetables are well coated with the sauce. 
6.  Serve over white or brown rice with additional tamari, if desired. 


Close Up of the Tastiness!  I loved the cashews!


Enjoy!

-Koko

Sunday, November 25, 2012

Giant Colorful Salad & a Ridiculous Amount of Pies

Sometimes I just don't have the energy.  For anything, especially cooking.  This past week has been completely insane at work.  My department is severely understaffed and cannot seem to retain the final person that will make everyones' lives easier.  Because of that, I was forced to make the pies for Thanksgiving all alone - one person preparing 210 standard size pies by themselves in three days.  Yes, 3 days, 30 hours, with only a small 2-rack half-sheet convection oven that cooks 200 degrees too hot and an ancient 2-rack full-sheet conventional oven that requires constant turning of the pans in order to not burn whatever is cooking inside.  This all amounted to a grand total of 5 pies cooked per hour.  Do the math - it was an impossible feat that almost killed me.  Because on top of making all the pies, I had to do inventory, ordering, covering breaks and all the rest of the stuff I usually do, all while getting over a terrible cold.  Very not cool.  Seriously.  It had me reevaluating how much longer I intent to stay working at this place.  February 1st will be one year, and that's what I was shooting for, but we'll see.  I still have to take my vacation, which was approved over a month ago, but was not able to be taken because of being so understaffed.  Sigh. 

Anyway, done with all this complaining.  All this means is that I had zero time or energy to focus on cooking anything, and since I was recovering from a terrible bout of fever and sore throat, I didn't have a strong appetite at all.  So a simple salad drizzled with olive oil and lemon juice, and sprinkled with sea salt and black pepper was all it took for me.  I had a package of heirloom cherry tomatoes that needed to be used up in the fridge, and I love cherry tomatoes, just not the weird explosion they make in your mouth when you eat them, so I cut them all in half (my one weird picky habit), added some julienned carrots and used my simple dressing.  Simple, stress free, easy.  Let's hope the next couple weeks heading to Christmas are less stressful.  *Fingers crossed*


My gorgeous simple, colorful salad


Mixed Green Salad

Mixed Greens
Julienned Carrots
Heirloom Cherry Tomatoes, halved
Dressing as desired.

Toss all ingredients together, add dressing and toss to coat.  That's it.  Eat.  Feel happy, light and stress free.


Koko

Wednesday, November 14, 2012

Spicy Black Bean & Quinoa Stuffed Peppers

I love me some stuffed peppers!  I ate these many times growing up and have thought about them over the years, but it never really went beyond simply thinking about them.  They were naturally meat filled (beef), so I couldn't get over thinking about using a soy substitute, but that didn't really sound all that appetizing to me.  I love beans (hubbs loves beans) and I love love quinoa (hubbs tolerates it but says it's too vegan - insert roll of eyes), so I thought about doing a black bean, quinoa stuffed pepper.  To keep it from being bland, I added some ground chipotle pepper powder and some other tasty peppers and they turned out amazingly!  So yummy and the pepper texture was just as I remembered it as a kid - firm enough to hold up, yet soft enough to be cut with a fork. 

They were really great and pretty quick, since I have been in the habit lately of cooking beans in large batches and freezing them in bags or plastic containers, then thawing them as I need them. I usually put 1-2 cups of cooked, drained beans in plastic bags, label them and freeze them flat.  Sometimes I will reserve the cooking liquid and place some beans in plastic deli containers, label and freeze them as well.  I use these for cooking Dominican beans.  Using the cooking liquid is the secret to having a thick sauce with the beans, and it gives them a lot of flavor as well.  Not to mention when the hubbs gets hungry and wants beans, all I have to do is thaw out the beans, add my seasoning, simmer and we have dinner in the amount of time it takes for the rice to cook.  Easy and delish!


The uncooked peppers stuffed with the quinoa/bean mix


Serves: 4-5

4 assorted color peppers, top removed and all insides taken out
2 cups cooked quinoa
1 cup cooked black  beans
3 chipotles in adobo sauce, chopped finely
1/2 teaspoon onion powder
1/2 teaspoon garlic powder
1/4 teaspoon black pepper
1/8 teaspoon cayenne pepper
2 teaspoons boullion powder
1 tablespoons olive oil
1/2 cup shredded carrots
1/2 small red onion, small diced, about 1/2 cup
3 cloves garlic, minced
Pepper tops, chopped
1 jalapeno, seeded and small diced
Fire roasted tomatoes with chipotles, to top peppers


1.  Preheat the oven to 375 degrees.  Place an 8" square baking pan on the stove and fill with 1/2" water.  Set aside until ready to  use.
2.  In a medium saute pan over medium heat, add the olive oil and allow it to become hot.  Add the shredded carrots, onion, garlic cloves, tops of peppers and jalapeno pepper.  Saute, stirring frequently for about 5 minutes, or until softened.
3.  In  the meantime, in a large mixing bowl, add the cooked quinoa and black  beans, the chipotles in adobo sauce, the spices (onion and garlic powder, black and cayenne peppers and boullion powder).  Add the cooked veggies and stir the mixture to coat. 
4.  Taste - it should taste a bit on the over-spicy side, but that's ok - it will mellow as it cooks.
5.  Fill the peppers with the stuffing, pressing down firmly to ensure the filling will not come out as it cooks.  Place the stuffed peppers into the prepared baking pan.  If the peppers have a tendency to tip over, prop them up with the other peppers.
6.  Cover the peppers with aluminum foil and bake for 35 minutes. 
7.  After the 35 minutes, remove the foil and top each pepper with a couple tablespoons of the fire roasted chipotle tomatoes. 
8.  Return the peppers to the oven without the foil and bake for an additional 5-10 minutes.
9.  Allow the peppers to cool for at least 10 minutes, then serve. 


Topped with fire roasted tomatoes


Dinner - stuffed pepper and a simple mixed green salad

Enjoy!


-Koko